
Why Google Calendar sync is a must-have to improve your performance in Salesforce with Axy OKR
It’s Friday, 6 pm, and most of your team is gone. The week is over and you begin to plan for what you have coming up next week: interview candidates for a new manager position, review employee compensation and benefits, and attend a career development conference. Your weekly project presentation also needs a few more improvements. Oh, and don’t forget, it’s your boss’ birthday.
Meetings, events, special occasions, assignments, and seminars can fill up our schedule before the week even begins so how do you actually find the time to properly help your team perform at the highest level they can achieve? Well, an easy and inexpensive way to boost your performance management skills is to sync your Google Calendar with Axy OKR.
Here are four reasons why you should sync your Google Calendar with Axy OKR
1. Plan for performance management

Breaking up your performance reviews into manageable, 30-minute sessions will help you gather and provide valuable feedback and decrease stressful workplace situations. In fact, consistent reviews lead to better results compared to long periods without supervision.
You might also be interested in: The power of focusing on what matters most
2. Track due dates

3. Keeps your team informed

4. See availability, quickly
 It’s an unfortunate feeling when you receive and accept an invitation to a fun event, only to realize that you already have a commitment at that time. By synchronizing your Google Calendar with Axy OKR, you’ll be able to quickly see when you are free and when you have prior commitments. Planning your One on Ones also becomes easier when you know your availability.
So how do you synchronize your Google Calendar with Axy OKR?

First, you have to set up your google account.
Then follow the next steps:
-
- Open Google console with Google admin credentials.
- In the top menu, click on “NEW PROJECT” or if you have existing projects, click on the existing project name and then in the “NEW PROJECT” button. Use the name “Salesforce Lightning Sync”, for example.
- Make sure that the new project is created and enable Google Calendar API and Google Contacts API:
- Click on APIs & Services on the main menu.
- Click on ENABLE APIS & SERVICES button.

- Find, select, and enable “Google Calendar API”.
- Repeat these steps with “Contacts API”
- Create credentials for a service account:
- Go to Main Menu > APIs & Services > Credentials.
- Click on “CREATE CREDENTIALS” and select “Service Account”.
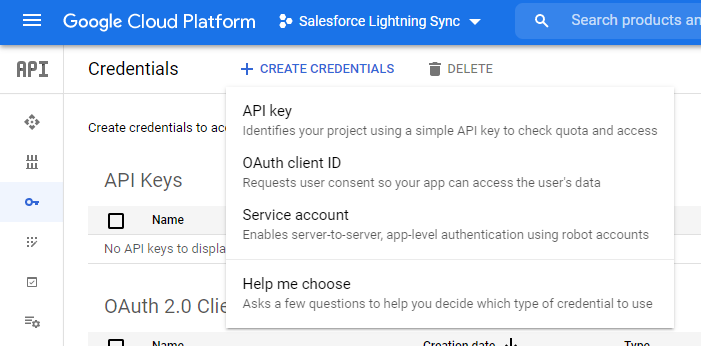
- Fill the form with these fields:
- Service account name: “Salesforce Lightning Sync”.
- Service account id: [auto filled]
- Service account description: “Salesforce Lightning Sync”.
- Click on the CREATE button.
- Select the Role “Project>Owner”.
- Click on the CONTINUE button.
- Click on the DONE button.
- Go to the Service Account section and click on the edit icon.

- Go to the Keys section and click on ADD KEY > Create New Key.
- Select the JSON option.
- Click on the CREATE button.*This will save a new JSON file in your local disk
- Click on the CLOSE button
- Save the key securely and share it with your Salesforce admin. (and only your Salesforce admin).
- Enable Domain-Wide Delegation:
- Go to Main Menu > IAM & Admin > Service Accounts.
- Click on Edit in the Actions column.
- Click on SHOW DOMAIN-WIDE DELEGATION.
- Enable G Suite Domain-wide Delegation.
- Fill the Product name for the consent screen with “Gmail Salesforce Sync”.
- Click on the SAVE button.
- Go to Domain-wide delegation > click on View Client ID and copy the Client ID value.
- Give write access to the Service Account:
- Open Google Admin Console.
- Go to Main Menu > Security.
- Find and click on the Advanced settings section.
- Go to the Domain-wide delegation section and click on MANAGE DOMAIN WIDE GENERATION.
- Click on Add new option

- Paste the Client ID copied in the bellow step & copy these endpoints separated by a comma:
- Click on the AUTHORIZE button.
Now you must go to Salesforce: please seek your Salesforce admin if you need additional permissions or help and follow the steps described below:
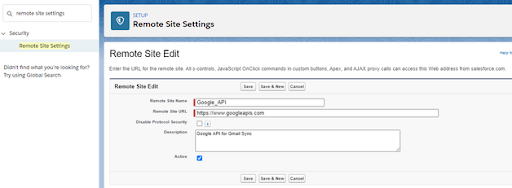
- Go to Salesforce Setup > Find and click on Remote Site Settings.
- Click on the New Remote Site button and fill the form with this data:
- Remote Site Name: Google_API
- Remote Site URL: https://www.googleapis.com
- Disable Protocol Security: false
- Description: Google API for Gmail Sync
- Active: true
- Go to Salesforce Setup > Find and click on Gmail Integration and Sync.
- Enable Lightning Sync.
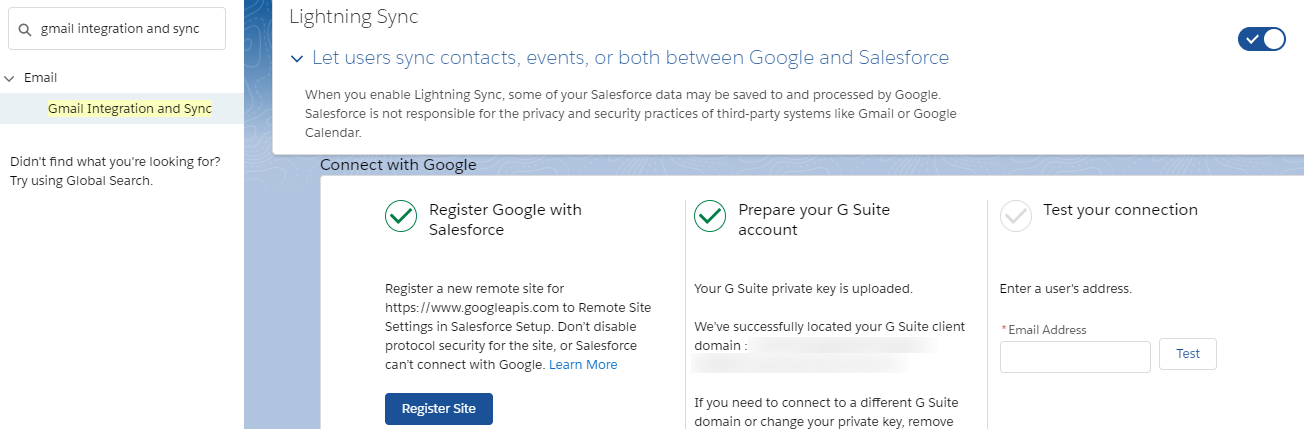
- In the section “Let users sync contacts, events, or both between Google and Salesforce”:
- Upload the JSON file downloaded in google setup in the Prepare your GSuite Account.
- Write an existing GMail email and click on Test.
- In the section “Set Sync Settings and Check Status”, click on the Go to Configs button.
- Click on the “New Google Configuration” button and fill in the information, for example:
- Name: Gmail Configuration
- Active: true
- Description: Gmail configuration for all the company users
- Select the users that you want to assign to this configuration
- Select the Contacts sync configuration
- Select the Event sync configuration.
We know the integration might seem complex, but if you follow the steps outlined above, you’ll be able to do it easily. Axy OKR is an application built using Salesforce native technology, so if you integrate additional applications like Trello, Jira, or even Microsoft Teams to Salesforce, Axy OKR will be able to take advantage of those apps as well.
Performance management can be improved substantially with the help of Axy OKRs capabilities, particularly by synchronizing your Google Calendar and giving you the ability to visualize important dates and plan your activities with your team ahead of time. You can learn more about how Axy OKR helps companies leverage their performance with additional Salesforce functionalities like Work.com by clicking here
