Axy Employee Management FAQ’s
IS AXY EMPLOYEE MANAGEMENT A SEPARATE APPLICATION?
AXY Employee Management and AXY OKR both exist within the same package/listing in the appexchange (Axy OKR). When you install Axy OKR, you receive both applications: Axy OKR and Axy Employee Management.
WHAT IS A 360 REVIEW?
A 360 review is a learning and growing employee performance review process driven by management which consists of receiving feedback from every possible angle of the employee’s contribution.
Usually, the participants of the 360 review process are:
- Self: The employee – their task is to self evaluate their performance during the period.
- Manager: Evaluate the performance of their employee during the period.
- Subordinates: Evaluate their boss’ performance during the period.
- Peers: Evaluate their colleague’s performance during the period
- Others* – Usually customers when the role is customer facing.
The 360 review process involves the whole company, starting with the human resources department who is responsible for planning and designing the review cycle, as well as analyzing the results once the evaluation is completed. However, it is also important to note that general management is also responsible for encouraging everybody to participate.
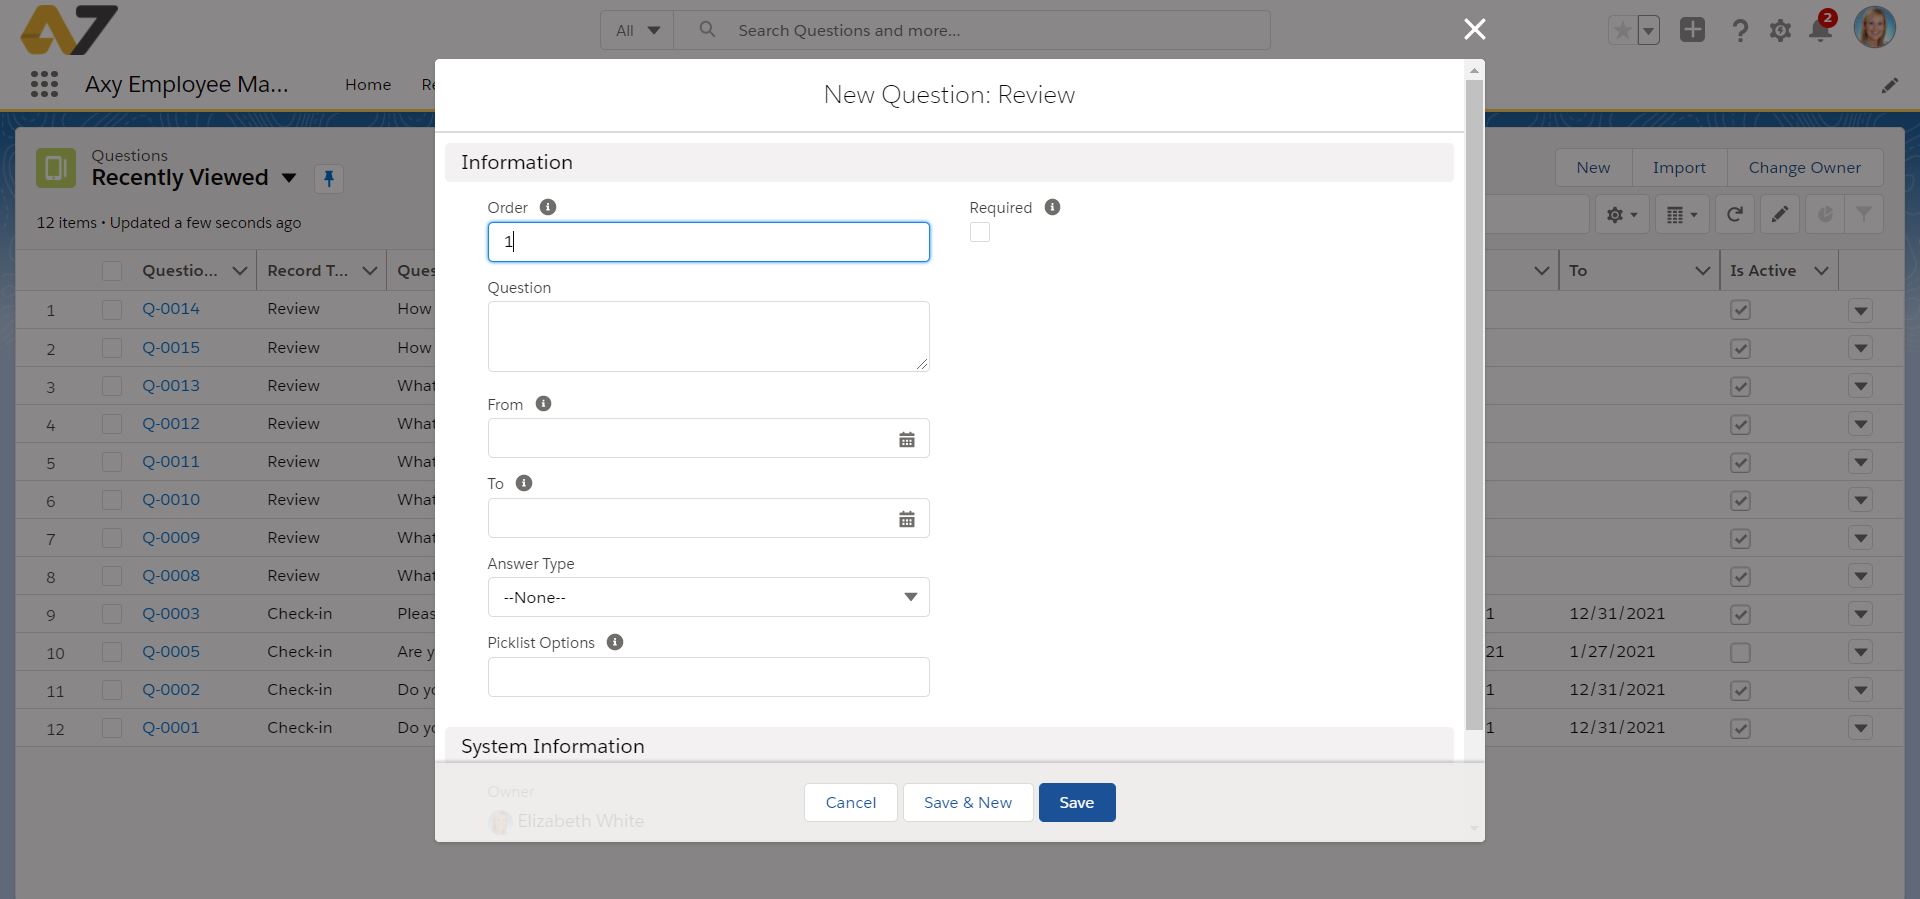
HOW CAN I CREATE A NEW QUESTION FOR A REVIEW?
Axy Employee Management leverages the Axy OKR Questions module to allow you to create specific questions that focus on the 360 review process.
Follow these steps to create a new question:
- Navigate to the Questions tab.
- Click on New.
- Select Review.
- Define the order of the question should be shown (1 = first question, 2 = second question, etc.)
- Define whether an answer to the question is required (mandatory)
- Type your question in the box.
- Define the From Date and To date for the question.
- Define the Answer type, if you select picklist you must define the picklist options.
- Review what you have defined and save your question.
WHAT IS A QUESTIONNAIRE IN AXY EMPLOYEE MANAGEMENT?
A questionnaire is simply a combination of different questions that get answered during a review cycle. Creating a questionnaire can help you ensure that employees with similar roles and responsibilities are reviewed objectively and equally. It can also simplify the process of improving reviews by easily adding or removing questions or roles depending on the results. A key feature of the questionnaire module is the option to quickly clone a questionnaire that you have already previously created. If you have a large team, you will find this very useful.
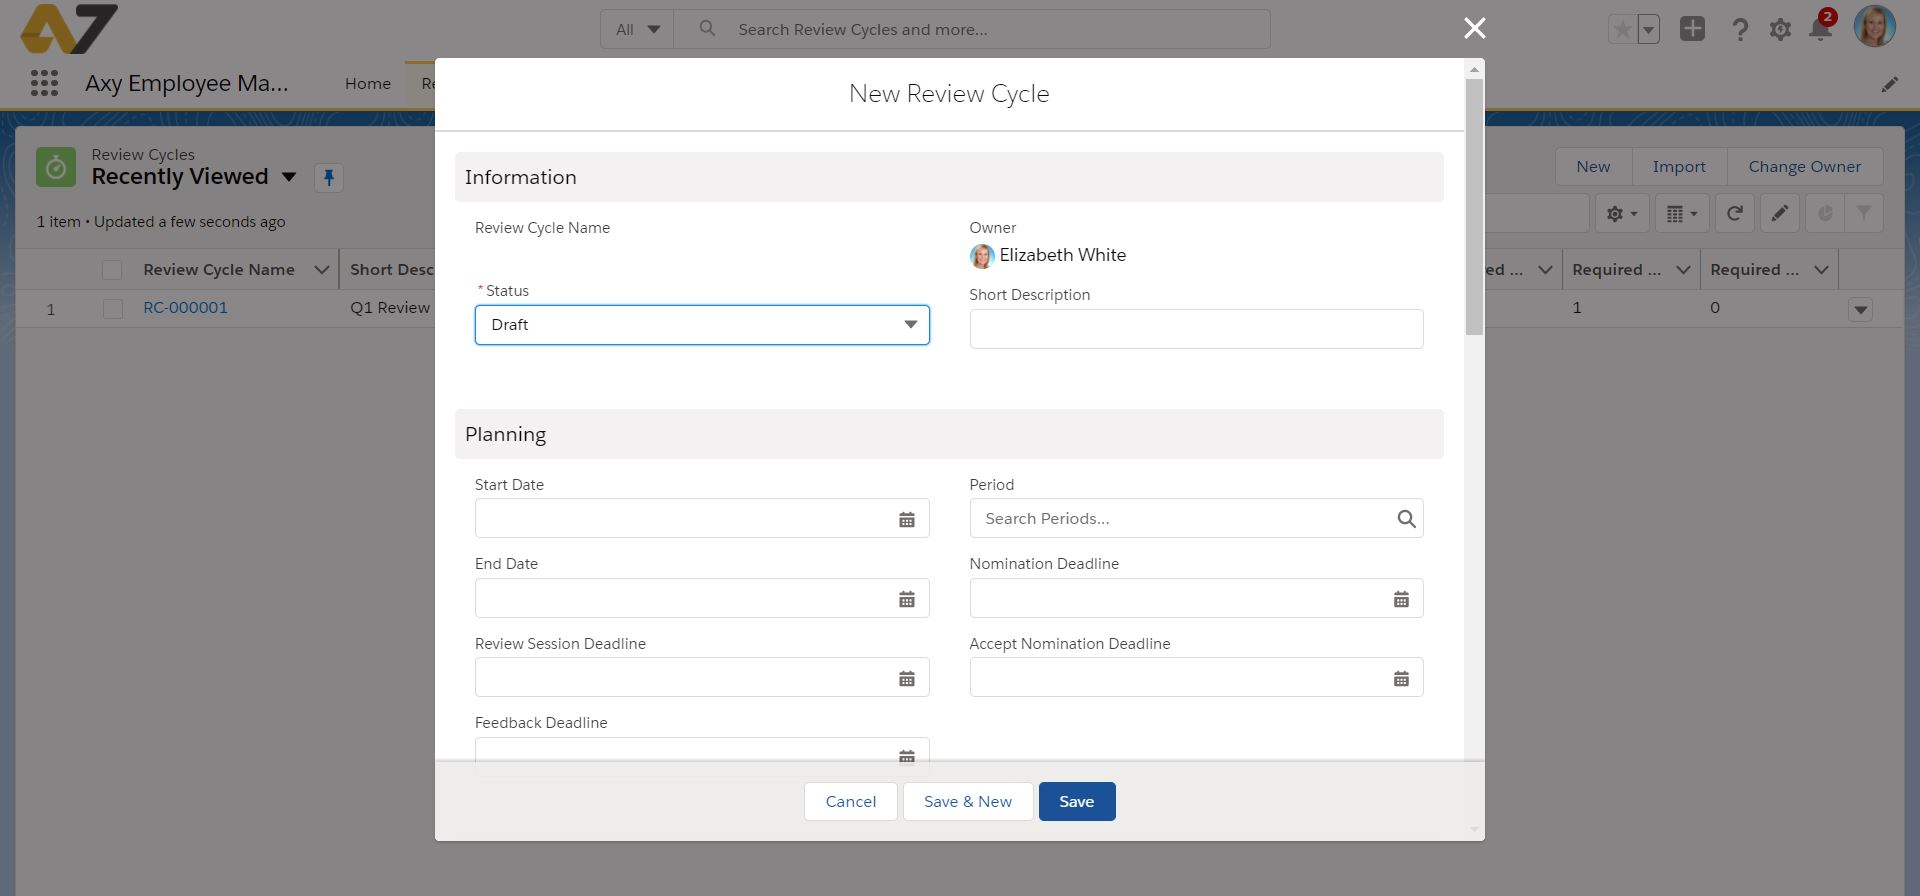
HOW DO I CREATE A REVIEW CYCLE?
The review cycle is designed for the person managing the review, usually someone in the human resources department (CHRO, VP of HR, Head of people, etc.). The review cycle includes a status bar that indicates the current stage of the review (Draft, Planned, In Progress, or Completed).
Follow these steps to create a new review cycle:
- Navigate to the Review Cycle tab
- Click on New
- Set the Start Date and End Date
- Select the Period – usually to be associated with the period on Axy OKR as a best practice.
- *Optional: Set the nomination deadline, accept nomination deadline, feedback deadline, and review session deadline. This will help you have a clear timeline of the review.
- Define whether Self feedback is required
- Define whether Manager feedback is required
- Set the required number of peers for feedback
- Set the required number of subordinates for feedback
There are also advanced settings for the Review cycle that you could potentially want to configure for your cycle since they help filter participants in the review process.
- Groups to include or exclude refer to public groups in Salesforce. You can determine which ones may or may not participate in the review cycle.
- Minimum months of service: Set the minimum amount (in numbers) of months an employee must have in the company to be able to participate in the review.
- Random Subordinates: If you check this box, Axy Employee Management will randomly select the subordinates for each review. If you leave it unchecked, the manager will have to manually select the subordinates that will participate in their feedback.
You can install Axy OKR in any Salesforce org type: production, sandbox, developer…
To start with the installation, you only need to go to Appexchange: Get it now!
- To install Axy OKR, you need to have the “Download AppExchange Packages” permission enabled on your profile for your Production environment.
- Log into the Appexchange and click on Get it now.
- Select if you want to install it in a sandbox or production environment.
- Check the installation details and number of licenses that you want to have and click on Confirm and Install. It is possible that you will need to re-enter your username and password.
- Select Install for Admins Only.

- Once installed, follow Post Install Configuration instructions.
In some cases, the Axy OKR installation could fail because the installation user doesn’t have the ‘Change Dashboard Color’ permission enabled. If this is the case, please follow these steps:
- Create a new permission set.
- Find the Change Dashboard Color permission and select it.
- Assign the new permission set to the installation user.
- Try to install the app again.
CAN I INSTALL AXY OKR IN A SANDBOX?
Yes, Axy OKR can be installed in any Salesforce org or environment, including a sandbox.
To install Axy OKR you need to have the Download AppExchange Packages permission enabled on your profile for both your Production and Sandbox environments.
- Log in to your Production org.
- Find Axy OKR in the Appexchange and click the Get it now! button.
- Follow the steps indicated in HOW DO I INSTALL AXY OKR?
HOW CAN I ASSIGN AXY OKR LICENSES TO USERS?
Once you have installed Axy OKR in your production org, it is time to assign the Axy OKR licenses to the users. You decide who will have access to the app so you must assign a license for each of them.
You can assign licenses to one specific user or a set of users, and also remove them.
Follow these simple steps to assign licenses:
- Go to Salesforce Setup
- Find for Installed Packages
- Click on Axy OKR Management
- Click on Manage Licenses
- Click Add Users
- Select all the users you want to assign to the package (After selecting a user, Salesforce automatically moves it to the Selected Users list).
- Click Add.
Salesforce will show you the list of the users with an active license.
To assign a license to a specific user, follow these steps:
- From Setup, enter Users in the Quick Find box, then go to Users
- Select the User you want to assign a license to.
- Scroll down and go to Managed Packages list. Click Assign Licenses.
- Salesforce automatically shows the Unassigned Packages list
- Select Axy OKR Management and click Add
If you want to remove a License so you can transfer it to another user:
- From Setup, enter Users in the Quick Find box, then go to Users
- Select the User you want to remove a license for.
- Scroll down and go to the Managed Packages list.
- Click on the Remove button
AXY OKRs LIMITATIONS
We have some limitations in our product.
- Users: It is not advised to have more than 800 users
- Active objectives: Rendering will not perform well above 350 active OKRS
- Active Automatic Key Results: Tracking results from Reports will not perform well above 400 reports.
- 10 levels of hierarchy in the OKR relationships to render in Treeview.
Important note:
Since Axy-OKR is a fully native solution, most of these limitations can be solved by custom development. Contact our Support team.
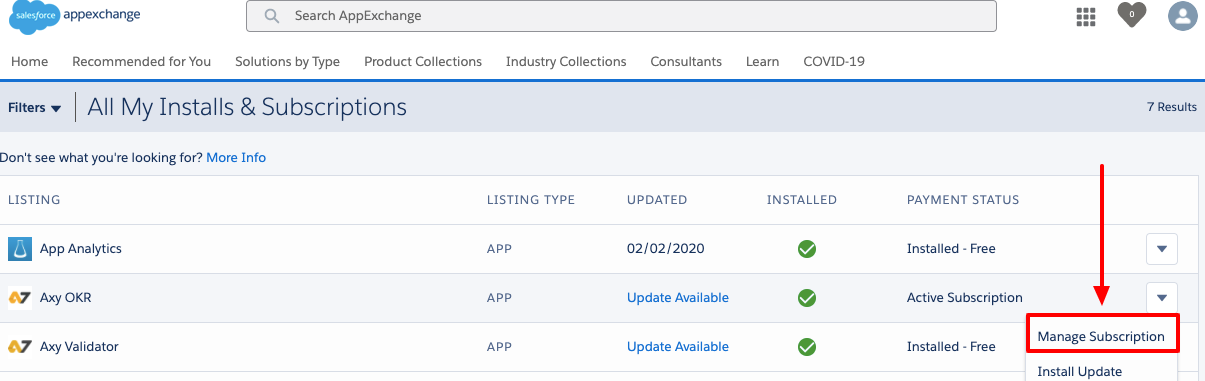
Your Admin user can add more licenses to your Axy OKR subscription by increasing them in the AppExchange.
Please follow these steps:
Step 1:
- Go to Appexchange.
- Click on Log in and use your Salesforce Admin credentials.
- Click on your photo and select My Installs & Subscriptions.
Step 2:
- Find Axy OKR and select Manage Subscription.
Step 3:
- Click on Edit

Step 4:
- Here, you will be able to add more licenses (users) to your Axy OKR Subscription and also set a discount coupon if you have it.
On this page, you can also change the Payment Method.
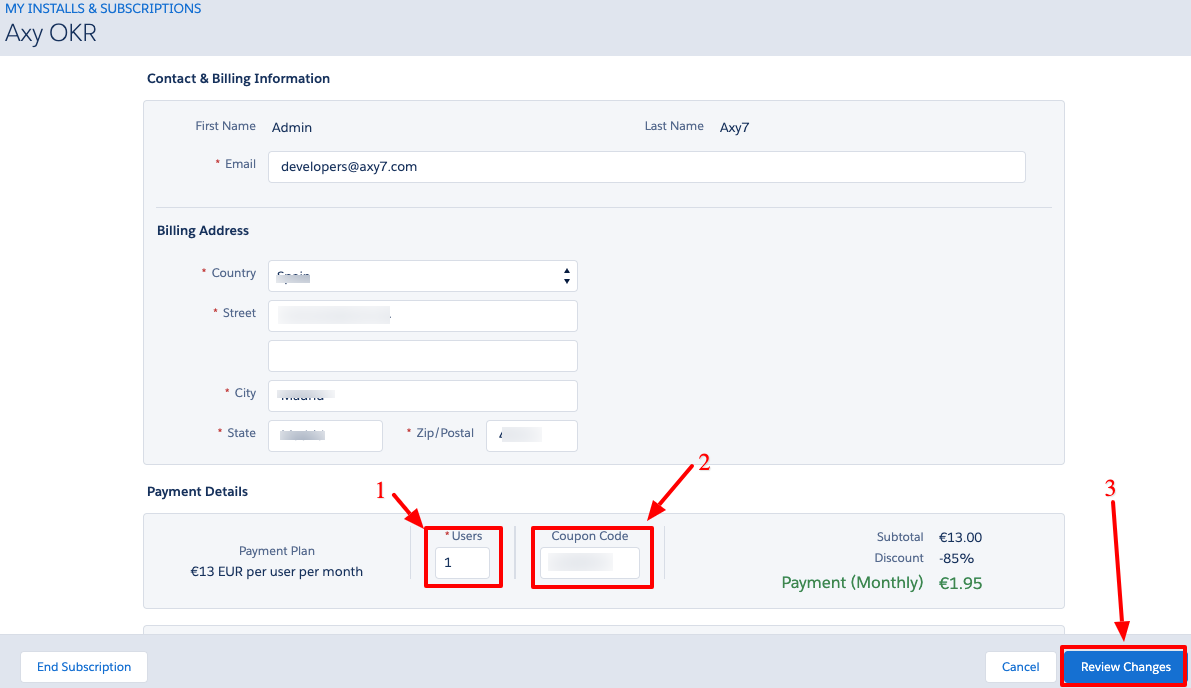
- Just review the changes, accept the terms & conditions, and click Save.
- After this, just wait 15 min to see the changes reflected in your Organization. Then, it’s time to assign the licenses and permission sets to your Salesforce Users.
If you have any questions, comments, or concerns, please contact us.
Your Admin user can add more licenses to your Axy OKR subscription by increasing them in the AppExchange.
Please follow these steps:
Step 1:
- Go to Appexchange.
- Click on Log in and use your Salesforce Admin credentials.
- Click on your photo and select My Installs & Subscriptions.
Step 2:
- Find Axy OKR and select Manage Subscription.
Step 3:
- Click on Edit
Step 4:
- Here, you will be able to update your credit card information for your Axy OKR Subscription and also set a discount coupon if you have it.
On this page, you can also change the Payment Method.
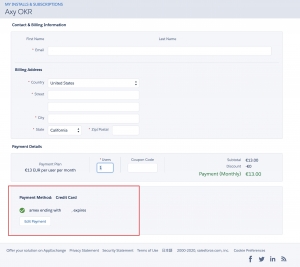
- Just review the changes, accept the terms & conditions, and click Save.
- After this, just wait 15 min to see the changes reflected in your Organization. Then, it’s time to assign the licenses and permission sets to your Salesforce Users.
If you have any questions, comments, or concerns, please contact us.
DOES AXY OKR SUPPORT CLASSIC SALESFORCE UI?
Axy OKR was developed for the Lightning Experience UI (LEX). However, you can still install Axy OKR and use it even if you only use the Classic UI in your org.
We developed Axy OKR for LEX since Salesforce announced in their spring ’19 release notes that they will no longer be adding features to the Classic UI. Every new feature that Salesforce develops for each of its Clouds will only be available for the LEX.
If you are still using the Classic UI in your Salesforce org, you can use Axy OKR by switching from Classic UI to LEX every time you want to use our app (Every user can switch from one UI to the other if your Admin configures it in your org).
It is really easy:
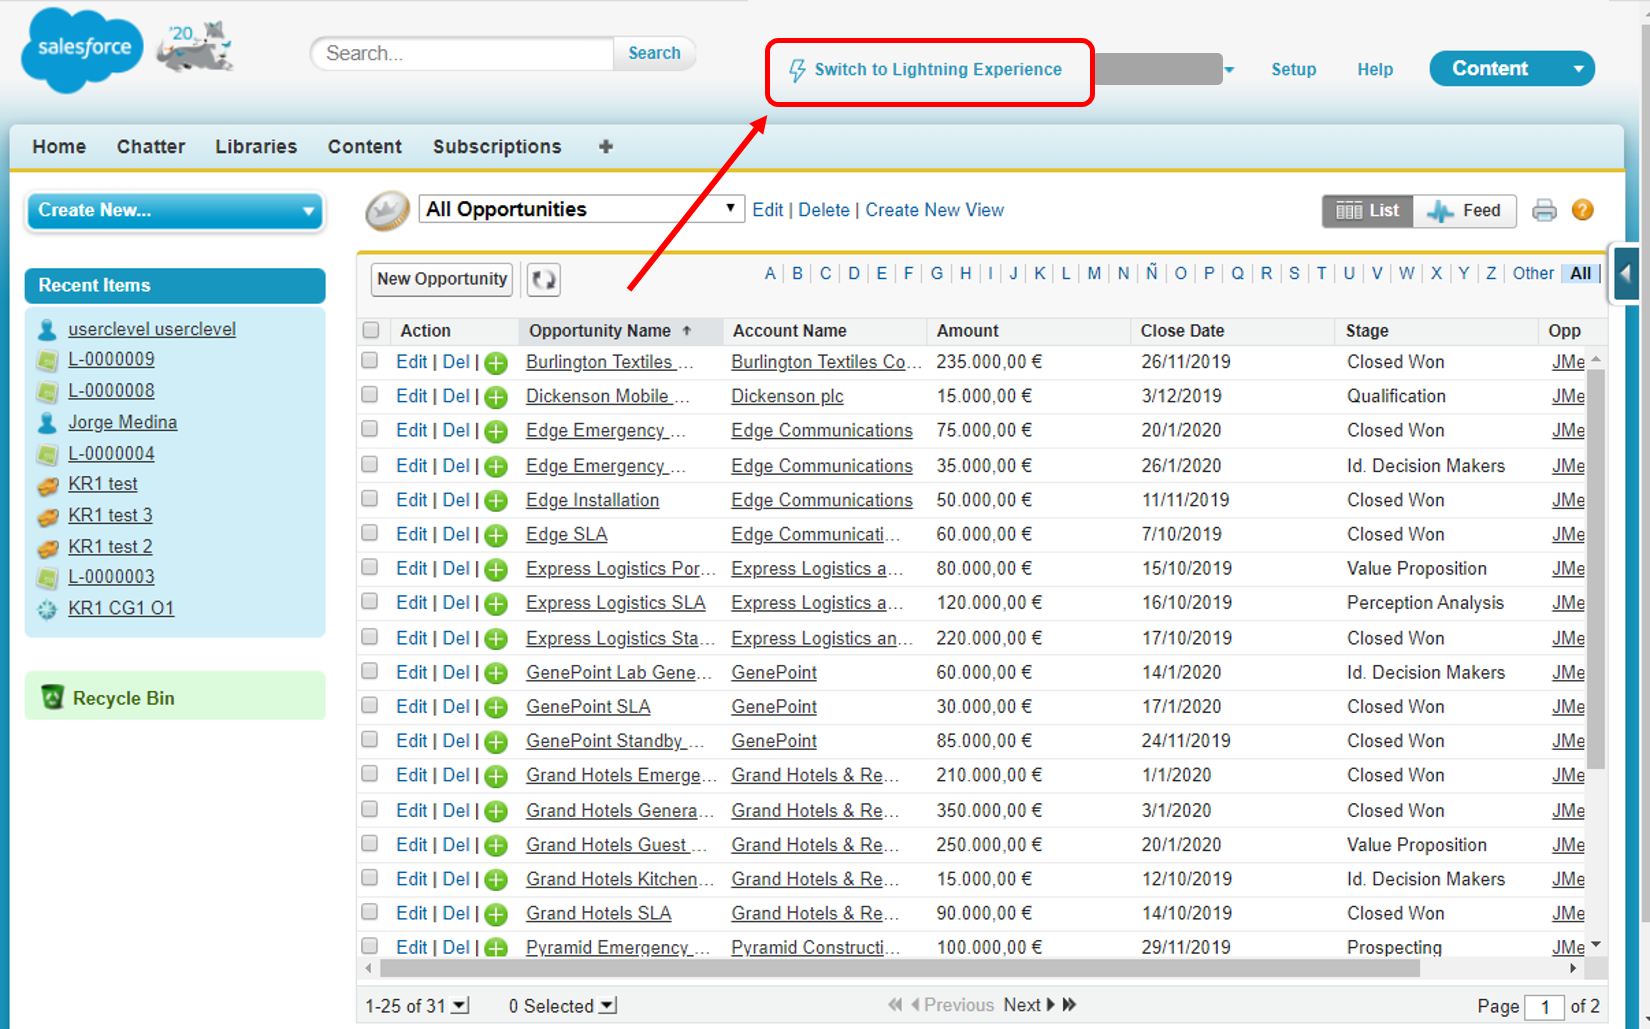
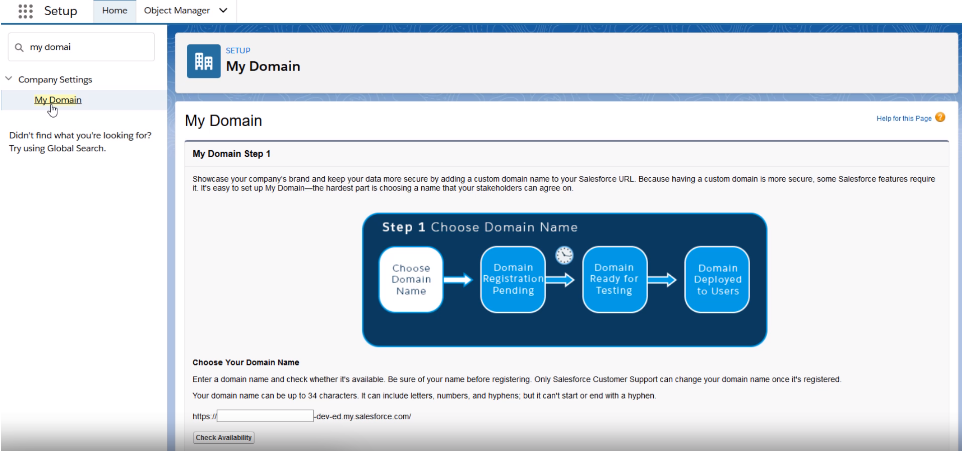
You have to be sure that My Domain is deployed in Your Salesforce Org as it is required to use Lightning components, the basis for LEX.
- When My Domain isn’t deployed in your org, user interface controls related to Lightning components may be hidden or inactive. Lightning components added to pages, tabs, and so on, don’t run and may be omitted or display a placeholder error message.
Deploying My Domain for your org is very straight forward.
- Go to Setup, find My Domain, and start the process following the instructions.
For a detailed description on how to deploy it, you can visit My Domain help in Salesforce Help. Here is a short video on what My Domain is and how to set it up.
ERROR: USER DOESN’T HAVE PERMISSION (changeDashboardColors) TO CREATE DASHBOARDS WITH COLORS
In some cases the Axy OKR installation could fail because the installation user doesn’t have the ‘Change Dashboard Color’ permission enabled. If this is the case, please follow these steps:
- Create a new permission set.
- Find the Change Dashboard Color permission and select it.
- Assign the new permission set to the installation user.
- Try to install the app again.
In order to uninstall Axy OKR, there are two processes that must be manually disabled first.
- Go to Setup
- Find for Process Builder
- Deactivate Axy OKR Objective and Axy OKR Period
Axy OKR also has a Flow that must be disabled.
- Go to Setup
- In Quick Find, look for Flows. You will see Quick KR Creation
- Click on the Drop-Down list at the right and select View Details and Versions
- Deactivate the flow
If you have already been using the app, you have probably assigned the Axy OKR Permission sets. Prior to uninstalling Axy OKR, you have to remove the assignments of every permission set.
- Go to Setup
- Search for Permission Sets
- Click on any of the Axy OKR permission sets and then Manage Assignments
- Click on Add Assignments
- You will access the list of users in your Salesforce org. Check the boxes of the users you want to remove that permission set from and click Remove Assignments
Now you can uninstall the package:
- Go to Setup
- Search for Installed Packages
- Click on Uninstall link near to the Axy OKR Management package
Please read the information provided by the uninstall process, taking into account what you want to do with the data you created while you were using the app.
If you want to save a copy of your data, please select the option “Save a copy of this package’s data for 48 hours after uninstall” and you will receive an email to save your data locally.
Uninstall Axy OKR from the Appexchnage
Sometimes Salesforce does not allow you to uninstall apps from the “Installed Packages” option in the administrator menu. If this is the case for you, then you can uninstall the app directly from the Appexchange. Please follow these instructions:
- Go to the Appexchange.
- Click on Log in and use your Salesforce credentials.
- Click on your photo and select My Installs & Subscriptions.
- Find Axy OKR and select Uninstall from the menu.

IS THERE A USER MANUAL OR GUIDE FOR AXY OKR?
Yes. We have a complete and comprehensive document that shows how to install, configure, and use Axy OKR. Please visit our Axy OKR User Guide.
- Assign licenses
- Assign Permissions Sets
- Share the Reports & Dashboards folders
- Enable the Axy OKR Notification Type to allow notifications in your Android and IOs devices
- Enable & Schedule the Check-in
- Create your Company Goal, Periods, and main OKRs with the Wizard
Now you are ready to start managing your OKRs with Axy OKR. Please go to our User Guide for a complete guide to the app.
HOW ARE PERMISSIONS MANAGED BY AXY OKR?
In Axy OKR you have three Permission Sets to assign to users with different functions and permissions:
- Axy OKR – User. This permission set gives standard access to the app including every app object, mainly Objectives and Key Results. All users of Axy OKR must have this permission assigned
- Axy OKR – C-Level User. This permission is designed for C-Level people, Directors, Managers, etc… the team members with the highest responsibility in managing the organization. These users have the same access as an Axy OKR – User but with Full Access to Company Goal records including View All and Modify All permissions.
- Axy OKR – Admin User. With this permission set, the assigned user has the same access as an Axy OKR – User, with the ability to access and set up the app in the Setup tab.
- Axy OKR – Review Manager. With this permission set, the assigned user will have the ability to configure and manage the Axy Employee Management module:
- Create and modify Review cycles
- Create and modify Questionnaires
- Create and modify Questions
Important note: You have to assign at least one Axy OKR – Admin User, one Axy OKR – C-Level User and one Axy OKR – Review Manager permission sets.
You can add several permission sets to the same user. For example, you can assign Axy OKR – Admin User and Axy OKR – C-Level User to the same user.
To assign them, follow the next steps for each of the three Axy OKR permission sets:
- Go to Setup
- Find for Permission Sets
- Click on any of the Axy OKR permission sets and then Manage Assignments
- Click on Add Asignments
- You will then see the list of users in your Salesforce org. Check the boxes of the users you want to assign that permission set to and click Assign.
- Remember to assign the Axy OKR – User permission to everyone will use the app
HOW CAN I SHARE COMPANY GOALS AND OBJECTIVES MANUALLY?
While manually sharing is available in Lightning Experience, we recommend installing this Salesforce Lab application
Once the app is installed, follow these steps to make sharing available for Company Goals and Objectives:
- Create the Action:
-
- Go to Setup
- Object Manager
- Search for the Company Goal object
- Buttons, Links, and Actions
- New Actions:
- Action Type: Lightning Component
- Lightning Component: LightningSharingAction
- Label and Name: Select the ones that work for you.
- Include the Action in the Page Layout:
-
- Go to Setup
- Object Manager
- Find the Company Goal object
- Page Layouts
- Company Goal Layout
- Select Mobile & Lightning Actions
- Find your new Action
- Drag & Drop to Salesforce Mobile and Lightning Experience Actions Section.
Follow the same instructions for the Objective sharing button.
SHARING REPORT & DASHBOARDS FOLDERS IN AXY OKR
- Go to Axy OKR Setup
- Go to the Check-in & Pulse section
- Activate Enable Check In
- Select a day and hour and click on the Save button
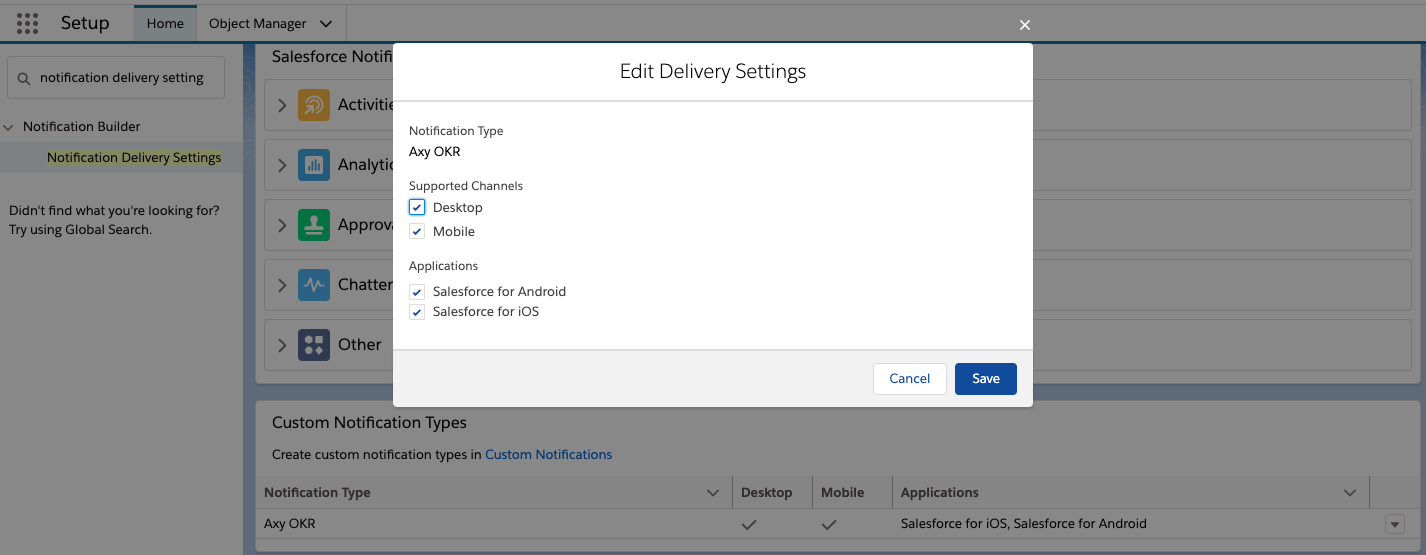
To allow Axy OKR notifications on your devices, you need to enable it in Salesforce Setup.
Follow these steps:
- Go to Salesforce Setup
- Search for Notification Delivery Settings
- Go to the Custom Notification Types section
- Find Axy OKR and click on edit on the right-hand side
- Enable Desktop, Mobile, Salesforce for Android and Salesforce for IOs and click Save
- Go to Axy OKR Setup
- Go to Check-in & Pulse section
- Activate Enable Check In
- Select a day and hour and click on Save button

To allow Axy OKR notifications in your devices, you will need to enable it in Salesforce Setup. Follow these steps:
- Go to Salesforce Setup
- Find for Notification Delivery Settings
- Go to Custom Notification Types section
- Find Axy OKR and click on edit on the right side.
- Enable Desktop, Mobile, Salesforce for Android and Salesforce for IOs and click Save
What is a Company Goal and how to use it correctly?
The concept of Company Goal represents a Single Strategic view that the entire organization should follow in an annual period. It also defines the cycle that your team should organize your OKRs within.
When you start planning your OKRs for the year, you must first set your Company Goal and the OKR Cycle structure:
- The period for the Company goal and the main Company OKRs (normally a year)
- The periods for the OKR execution during the year (usually Quarters)
- The Planning and Wrap-Up time for every period (usually one or two weeks at the beginning and end of the period)
Main Company OKRs will then be defined from the Company Goal. Axy OKR provides a wizard in order to create the Company Goal, the Periods, and one main Company OKR. You must define the rest of the main Company OKRs that you need.
As an example, the wizard will help you create the following:
Company Goal: First one in market share in 2020
- Main Objective 1: Double size at the end of fiscal year 2020 (Yearly Period)
- Key Result 1.1: Launch at least two new product releases
- Key Result 1.2: $57M revenue in 2020
- Key Result 1.3: Increase NPS by 20%
Then you have to create the rest of the main Company OKRs. Continuing with the example:
- Main Objective 2: Engage employees and increase loyalty (Yearly Period)
- Key Result 2.1: Get Best Place to Work certification
- Key Result 2.2: Improve referral program by 15%
- Key Result 2.3: Reduce employee attrition by 17%
- Main Objective 3: ………
The Company Goal and main company OKRs are set as private by default. This ensures that the Management and C-Level executives have enough time to discuss and define the OKRs and basic strategy to follow. Once agreed, they are shared with the rest of the organization and marked as public afterward, after which the rest of the team is able to create OKRs related to any higher level OKR.
You can access our FAQ about Objectives, Key Results, and Initiativeshere.
HOW CAN I CREATE A QUESTION FOR MY TEAM WEEKLY CHECK-IN?
- Head to the questions tab, then click on new. A pop up will appear.
- In record type select Check-In.
- Then type your question.
- Complete the information form by defining a start date (from) and end date (to) the answer type (text, number, checkbox, or picklist). If you select Picklist, enter the possible options on the picklist options field. Separate each option with a comma.
- If the question is mandatory check the required checkbox at the left bottom corner.
- Then click Save.
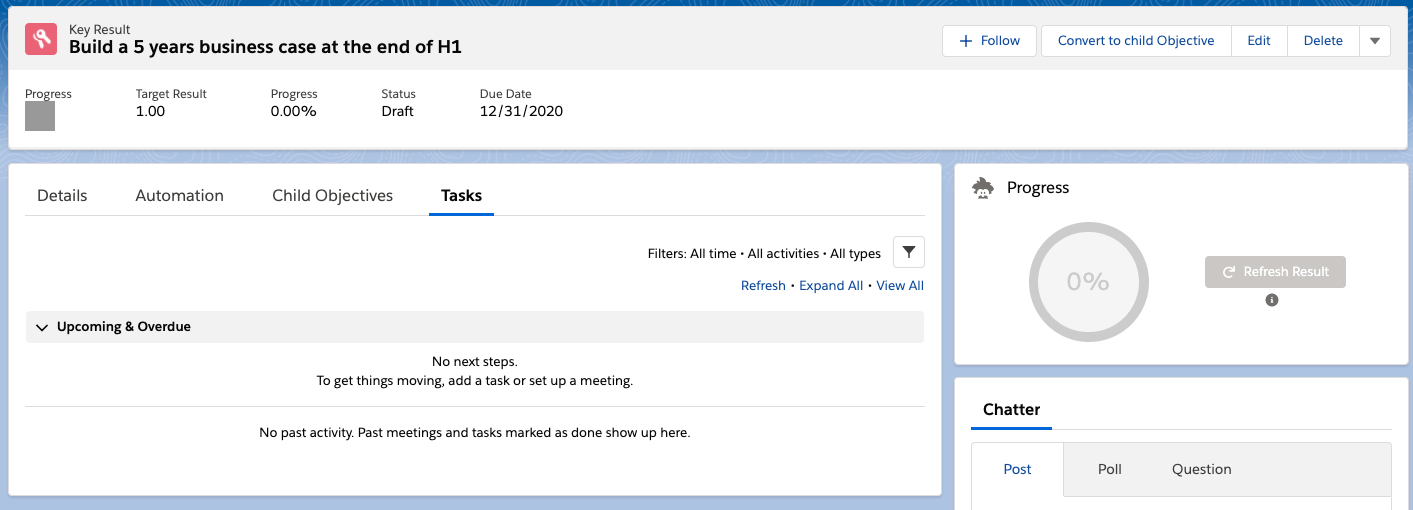
ENABLE TASK CREATION ON THE KEY RESULT PAGE
If you can see the Tasks tab but you can’t see the component to create a Task like in the image below, follow the instructions to re-use or create a new Global Action.
As part of a managed package, we cannot select your record types. To configure them, you have 3 options:
Create an Object-Specific Quick Action
- Go to the Setup page, click on the “Object Manager” tab, and search for “Key Result”.
- Select the “Buttons, Links, and Actions” option.
- Click on the “New Action” button using this information:
- Action Type: Create a Record
- Target Object: Task
- Record Type: [The one you want to use] *OKR users should have access to the record type in their profiles
- Standard Label Type or Label: [Select or create a label]
- Name: the unique name for the global action
- Description: write a brief description
- Create Feed Item: If enabled, it creates a feed item when the action is performed. The feed item’s fields are defined by the target object’s compact layout.
- Success Message: the success message you want to show when the task is created
- Click on the “Save” button.
- Select the fields to show on the component layout.
- Select the “Page Layouts” menu item and click on the “Key Result Layout” link.
- Select the “Mobile & Lightning Actions” option and add the recently created action to the “Salesforce Mobile and Lightning Experience Actions” section.
- Remove the “New Task” Action from the “Salesforce Mobile and Lightning Experience Actions” section.
- Click on the “Save” button.
Create a new Global Quick Action
- Go to the Setup page and search “Global Actions”.
- Click on the “New Action” button using this information:
- Action Type: Create a Record
- Target Object: Task
- Record Type: [The one you want to use] *OKR users should have access to the record type in their profiles
- Standard Label Type or Label: [Select or create a label]
- Name: the unique name for the global action
- Description: write a brief description
- Create Feed Item: If enabled, it creates a feed item when the action is performed. The feed item’s fields are defined by the target object’s compact layout.
- Success Message: the success message you want to show when the task is created
- Click on the “Save” button.
- Select the fields to show on the component layout.
- Click on the “Object Manager” setup tab and search for “Key Result”.
- Select on the “Page Layout” menu item and click on the “Key Result Layout” link.
- Select the “Mobile & Lightning Actions” option and add the recently created action to the “Salesforce Mobile and Lightning Experience Actions” section.
- Remove the “New Task” Action from the “Salesforce Mobile and Lightning Experience Actions” section.
- Click on the “Save” button.
Re-use an existing Global Action
If you have an existing task global action with a valid record type, you can add your action to the layout by following the previous steps from 5 to 9 using your global action instead of the new one.
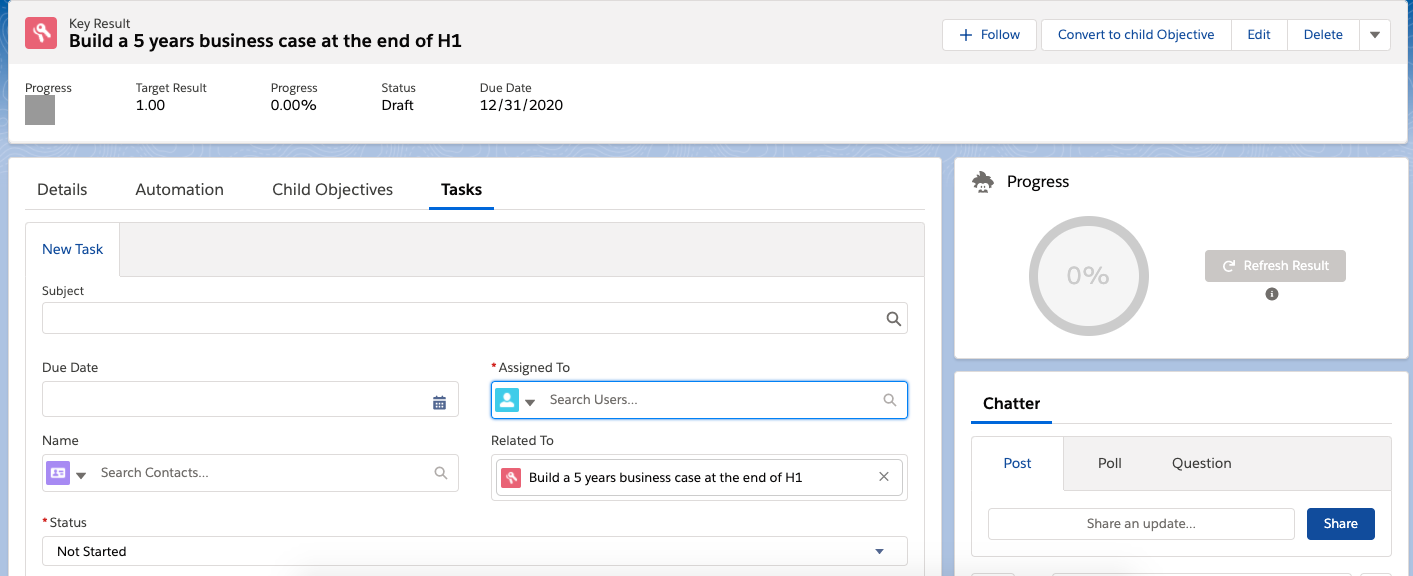
In both cases, you will see the task component in the Key Result page as below:
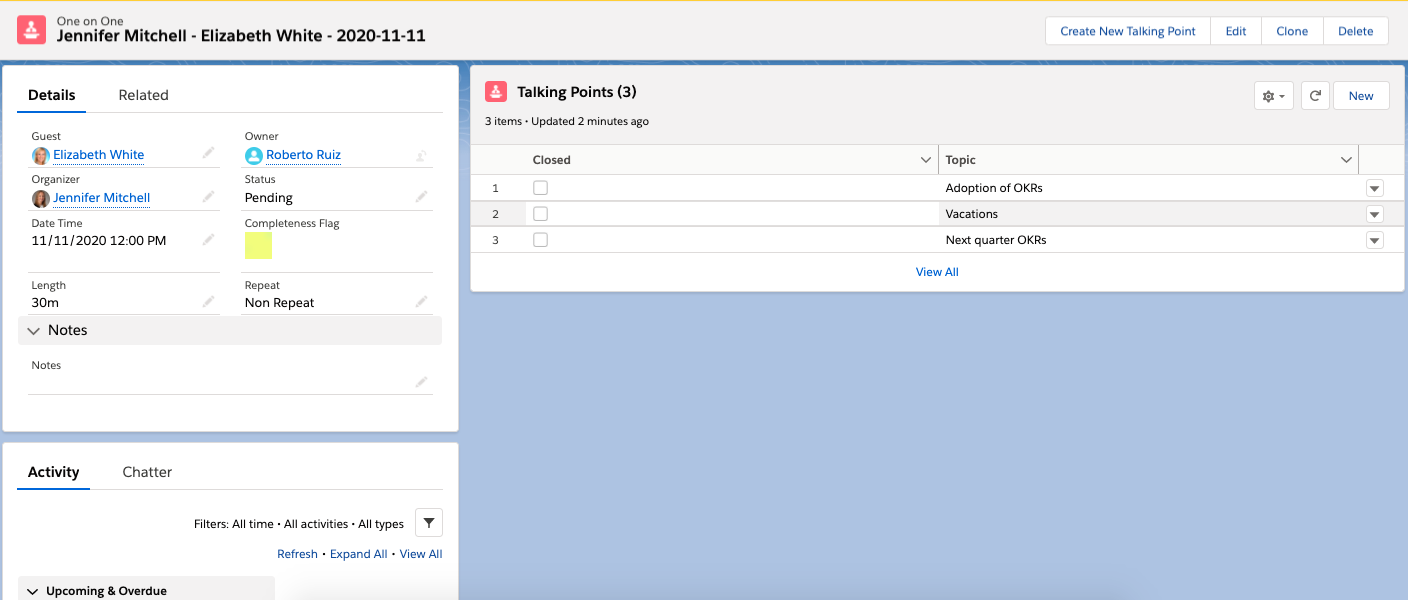
ENABLE EVENT CREATION ON ONE ON ONE PAGE
If you cannot create an event in the one on one record page like in the below image, follow the instructions to re-use or create a new Global Action.
As part of a managed package, we cannot select your record types. To configure them, you have 3 options:
Create an Object-Specific Quick Action
- Go to the Setup page, click on the “Object Manager” tab and search for “One on One”.
- Select the “Buttons, Links, and Actions” option.
- Click on the “New Action” button using this information:
- Action Type: Create a Record
- Target Object: Event
- Record Type: [The one you want to use] *OKR users should have access to the record type in their profiles
- Standard Label Type or Label: [Select or create a label]
- Name: the unique name for the global action
- Description: write a brief description
- Create Feed Item: If enabled, it creates a feed item when the action is performed. The feed item’s fields are defined by the target object’s compact layout.
- Success Message: the success message you want to show when the event is created
- Click on the “Save” button.
- Select the fields to show on the component layout.
- Select the “Page Layouts” menu item and click on the “One on One Layout” link.
- Select the “Mobile & Lightning Actions” option and add the recently created action to the “Salesforce Mobile and Lightning Experience Actions” section.
- Remove the “New Task” Action from the “Salesforce Mobile and Lightning Experience Actions” section.
- Click on the “Save” button.
Create a new Global Action
- Go to the Setup page and search for “Global Actions”.
- Click on the “New Action” button using this information:
- Action Type: Create a Record
- Target Object: Event
- Record Type: [The one you want to use] *OKR users should have access to the record type in their profiles
- Standard Label Type or Label: [Select or create a label]
- Name: the unique name for the global action
- Description: write a brief description
- Create Feed Item: If enabled, it creates a feed item when the action is performed. The feed item’s fields are defined by the target object’s compact layout.
- Success Message: the success message you want to show when the event is created
- Click on the “Save” button.
- Select the fields to show on the component layout.
- Click on the “Object Manager” setup tab and search for “One on One”.
- Select the “Page Layout” menu item and click on the “One on One Layout” link.
- Select the “Mobile & Lightning Actions” option and add the recently created action to the “Salesforce Mobile and Lightning Experience Actions” section.
- Remove the “New Event” Action from the “Salesforce Mobile and Lightning Experience Actions” section.
- Click on the “Save” button.
Re-use an existing Global Action
If you have an existing event global action with a valid record type, you can add your action to the layout by following the previous steps from 5 to 9 using your global action instead of the new one.
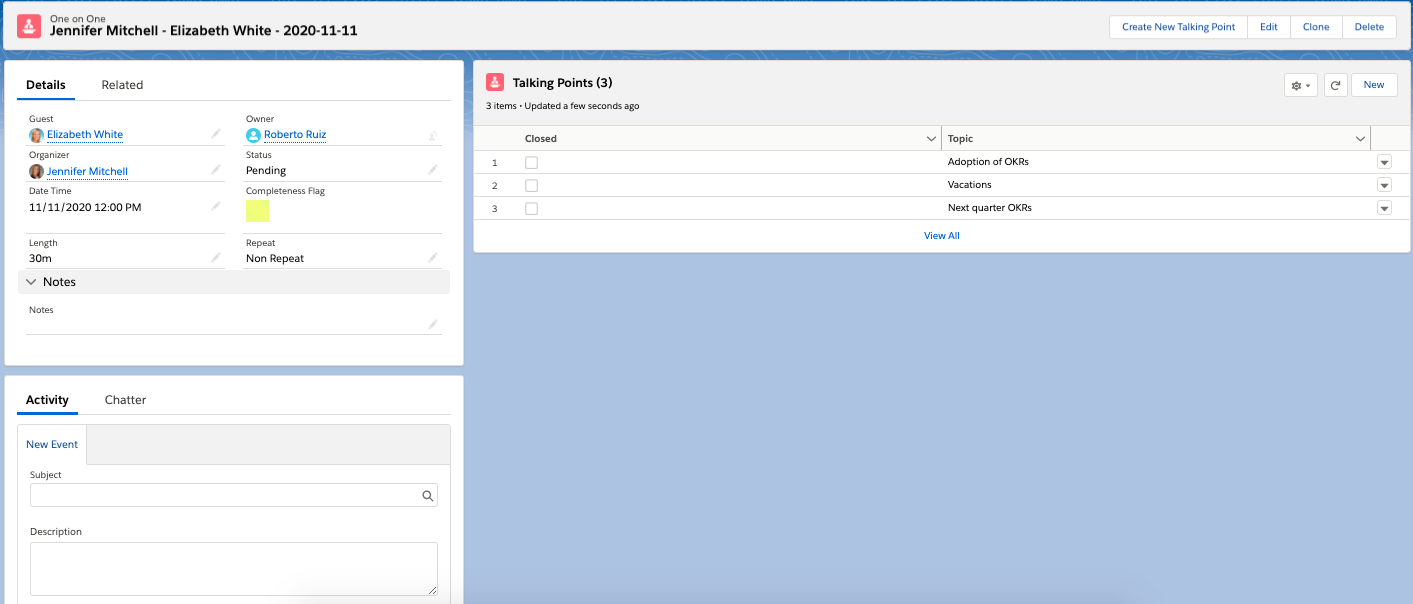
In both cases, you will see the task component in the One on One page as below:
Salesforce Classic
- Choose one of the following:
- Navigate to Setup –> My Personal Information –> Grant Login Access
- Navigate to Your Name –> My Settings –> Personal –> Grant Account Login Access
- Use the Access Duration picklist to set the number of days to allow Login Access.
- Click Save.
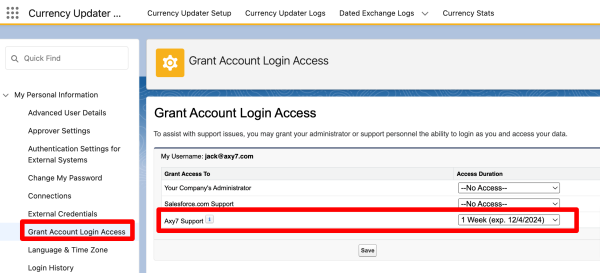
Lightning Experience User Interface
- Click on the logged-in user’s avatar on the top right-hand side of the screen and choose Settings.
- Click on Grant Account Login Access.
- Use the Access Duration picklist to set the number of days to allow Login Access.
- Click Save.