
Objectives and Key Results (OKRs) methodology is a widespread strategy for goal setting within some of the best, high growth organizations. The purpose of OKRs is to align the company, team, and their personal goals towards measurable results while having all team members working together in one unified direction.
OKRs were first introduced and defined by Andy Grove for Intel in the 70s. Today, OKRs are a fundamental piece for guiding many organizations like Google, LinkedIn, Intel, Zynga, Sears, and Oracle….
An Objective represents WHAT you want to achieve. Objectives are qualitative goals. They have to be ambitious and set the direction and focus of the company, team, or individual in a specific period of time. The objective has to be significant and action-oriented, but also challenging: the principle of inspiration.
Key Results define HOW you are going to achieve that Objective. Key Results have to be specific, time-bound, and metric-driven; measurable, and verifiable. They have to show the path that needs to be taken to reach the objective.
The Objective is the desired outcome and the Key Results are the measurable steps or “pieces” required to achieve that outcome. It is important to define enough relevant KRs that when reached, will produce the outcome.
Initiatives are tasks and assignments that need to be executed in order to achieve Key Result milestones; they are things that you do. The owners of Initiatives must have full control over completing them which means completing them should not be dependent on something or someone else.
The OKR Period is a portion of time during which your organization, teams, and individuals focus on delivering their OKRs. The most commonly used period in OKRs is the quarter as it is long enough to plan, execute, review, and take corrective action on your OKRs, but also short enough to be truly focused and aligned on them.

HOW DO I CREATE AN APPROVAL PROCESS FOR AN OBJECTIVE?
1. Go to Setup, then search for and click on “Approval Processes”.
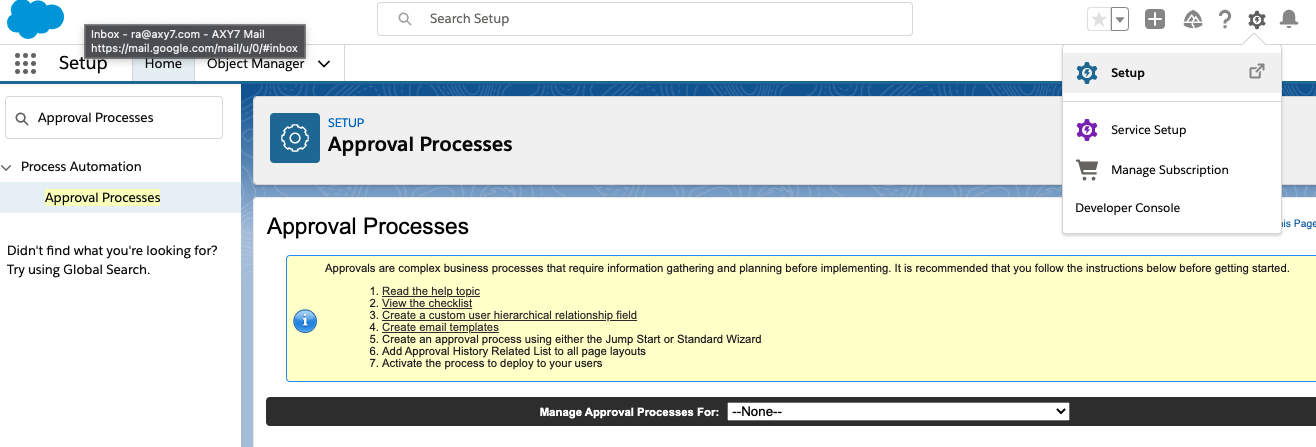
2. In the “Manage Approval Processes For” option, select “Objective”.
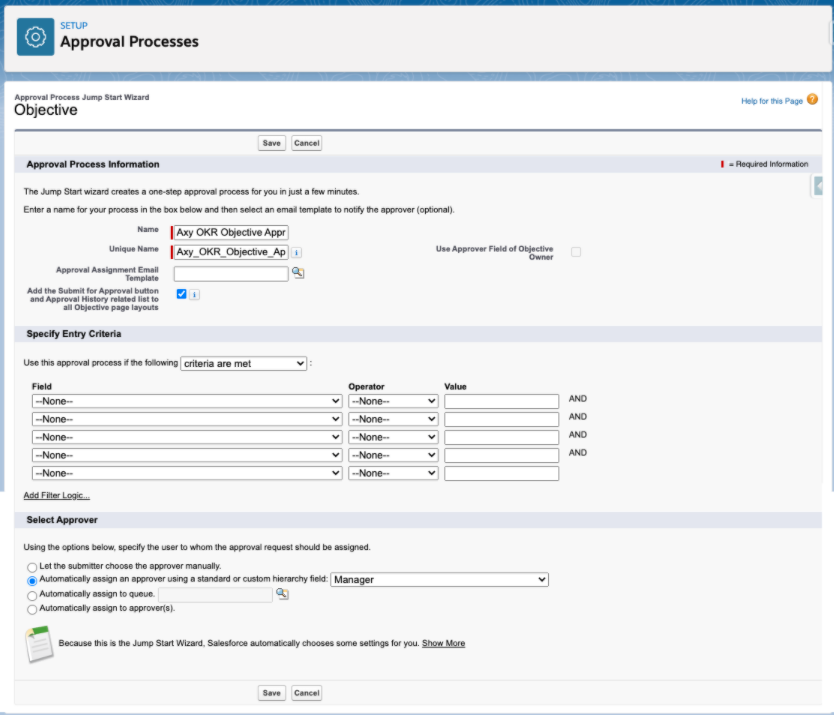
4. Complete the wizard with the following information and click “Save”:
- Name: (ex. Axy OKR Objective Approval Process)
- Unique Name: (ex. Axy_OKR_Objective_Approval_
Process) - (Optional) Approval Assignment Email Template: (if you’d like to receive an email for each approval assignment, create an email template within Salesforce and add it here)
- For “Automatically assign an approver using a standard or custom hierarchy field” in the ‘Select Approver’ section, choose “Manager”
WHAT OKR ADOPTION BEST PRACTICES ARE RECOMMENDED?
OKRs have to enable the whole organization to work in the same direction (Alignment), with a common and clear target (Focus) that is easily measurable (Tracking) and that motivates people to deliver the best of themselves (Stretching).
Focus-Alignment-Tracking-Stretching are the characteristics of good OKRs and as John Doerr defined in his book “Measure What Matters”, the “Superpowers” that OKRs give to organizations. There are several best practices that can be utilized when implementing OKRs within your organization.
Objectives
- Simply WHAT you want to achieve
- Important, concrete and action oriented
- Between 3 to 5 Objectives per person
Key Results
- They benchmark and monitor HOW we get to the objective
- KR should be concise, specific, and measurable
- KRs typically include hard numbers
- Between 2 to 5 Key Results per Objective
Let’s see it in an example:
Objective:
- Improve Sales Team satisfaction
Key Results:
- Define Team Building Activities plan by April
- Coach key people in the Sales team by May
- Execute the Team building activities plan in Q1
- Run the Employee Satisfaction Survey by mid-June: Employee Satisfaction Index >89%
This objective has been defined for the second quarter of the year (Period) and it has four Key Results, each of them with a Due Date and a Target Result, so therefore totally measurable.
Alignment is key for organizational success. By aligning OKRs, you can set Top-Down or request Bottom-Up objectives
Setting Top-Down objectives ensures that the organization is completely aligned with the Company Goals. On the other hand, asking for Bottom-Up objectives leverages the commitment, innovation, and knowledge of every person in your organization towards the achievement of your goals.
A good balance between both types of objectives is key to OKR implementation success. The best practice is to set at least 50%-60% of the objectives Top-Down.
In order to guarantee alignment in the organization, every objective has to be related to the Company Goal in some way: it could be a direct child of the Company Goal or it could be related to an upper Objective through a parent Key Result. Each objective in the organization has to be related and contribute to another objective through one of its key results.
This way, the whole organization is aligned with the Company goal and Main Objectives.

CAN EMPLOYEES THAT ARE NOT USING SALESFORCE USE AXY OKR?
A Salesforce license with access to the Axy OKR package is required for each person who wants to use the features of the application.
WHAT SALESFORCE EDITIONS ARE SUPPORTED BY AXY OKR?
You can install Axy OKR in any Salesforce org type:
- Professional
- Enterprise
- Unlimited
- Performance
You can install Axy OKR in any Salesforce org type: production, sandbox, developer…
To start with the installation, you only need to go to Appexchange: Get it now!
- To install Axy OKR, you need to have the “Download AppExchange Packages” permission enabled on your profile for your Production environment.
- Log into the Appexchange and click on Get it now.
- Select if you want to install it in a sandbox or production environment.
- Check the installation details and number of licenses that you want to have and click on Confirm and Install. It is possible that you will need to re-enter your username and password.
- Select Install for Admins Only.

- Once installed, follow Post Install Configuration instructions.
In some cases, the Axy OKR installation could fail because the installation user doesn’t have the ‘Change Dashboard Color’ permission enabled. If this is the case, please follow these steps:
- Create a new permission set.
- Find the Change Dashboard Color permission and select it.
- Assign the new permission set to the installation user.
- Try to install the app again.
CAN I INSTALL AXY OKR IN A SANDBOX?
Yes, Axy OKR can be installed in any Salesforce org or environment, including a sandbox.
To install Axy OKR you need to have the Download AppExchange Packages permission enabled on your profile for both your Production and Sandbox environments.
- Log in to your Production org.
- Find Axy OKR in the Appexchange and click the Get it now! button.
- Follow the steps indicated in HOW DO I INSTALL AXY OKR?
HOW CAN I ASSIGN AXY OKR LICENSES TO USERS?
Once you have installed Axy OKR in your production org, it is time to assign the Axy OKR licenses to the users. You decide who will have access to the app so you must assign a license for each of them.
You can assign licenses to one specific user or a set of users, and also remove them.
Follow these simple steps to assign licenses:
- Go to Salesforce Setup
- Find for Installed Packages
- Click on Axy OKR Management
- Click on Manage Licenses
- Click Add Users
- Select all the users you want to assign to the package (After selecting a user, Salesforce automatically moves it to the Selected Users list).
- Click Add.
Salesforce will show you the list of the users with an active license.
To assign a license to a specific user, follow these steps:
- From Setup, enter Users in the Quick Find box, then go to Users
- Select the User you want to assign a license to.
- Scroll down and go to Managed Packages list. Click Assign Licenses.
- Salesforce automatically shows the Unassigned Packages list
- Select Axy OKR Management and click Add
If you want to remove a License so you can transfer it to another user:
- From Setup, enter Users in the Quick Find box, then go to Users
- Select the User you want to remove a license for.
- Scroll down and go to the Managed Packages list.
- Click on the Remove button
AXY OKRs LIMITATIONS
We have some limitations in our product.
- Users: It is not advised to have more than 800 users
- Active objectives: Rendering will not perform well above 350 active OKRS
- Active Automatic Key Results: Tracking results from Reports will not perform well above 400 reports.
- 10 levels of hierarchy in the OKR relationships to render in Treeview.
Important note:
Since Axy-OKR is a fully native solution, most of these limitations can be solved by custom development. Contact our Support team.
Your Admin user can add more licenses to your Axy OKR subscription by increasing them in the AppExchange.
Please follow these steps:
Step 1:
- Go to Appexchange.
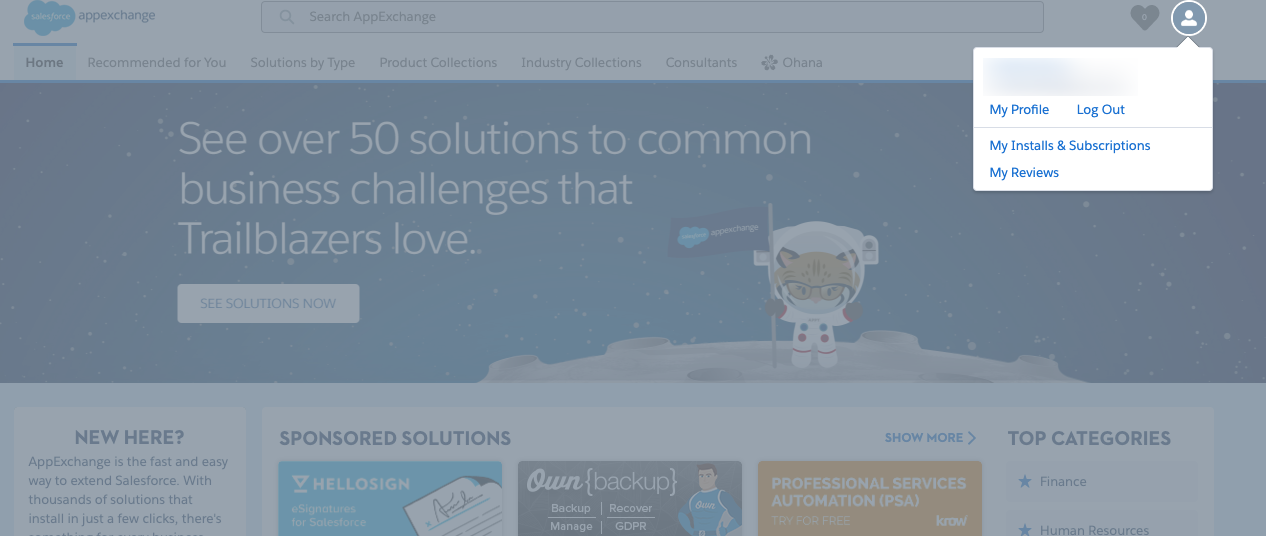
- Click on Log in and use your Salesforce Admin credentials.
- Click on your photo and select My Installs & Subscriptions.
Step 2:
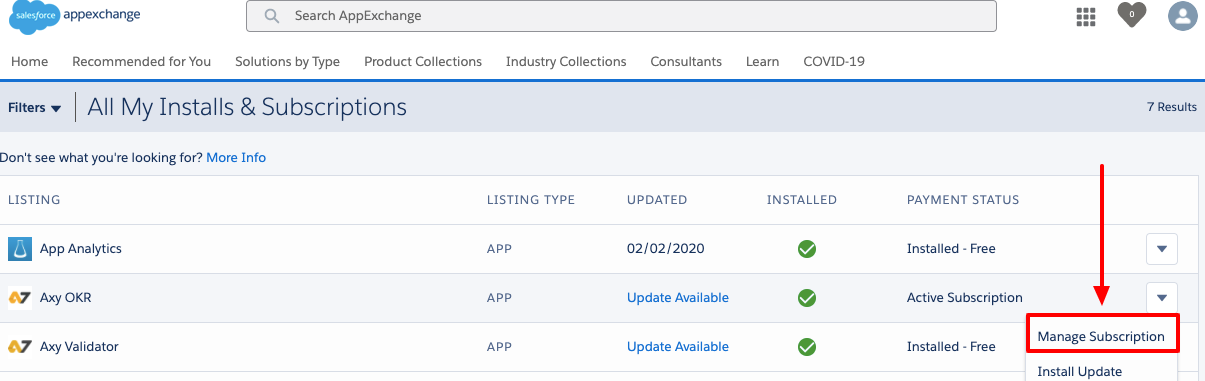
- Find Axy OKR and select Manage Subscription.
Step 3:
- Click on Edit

Step 4:
- Here, you will be able to add more licenses (users) to your Axy OKR Subscription and also set a discount coupon if you have it.
On this page, you can also change the Payment Method.
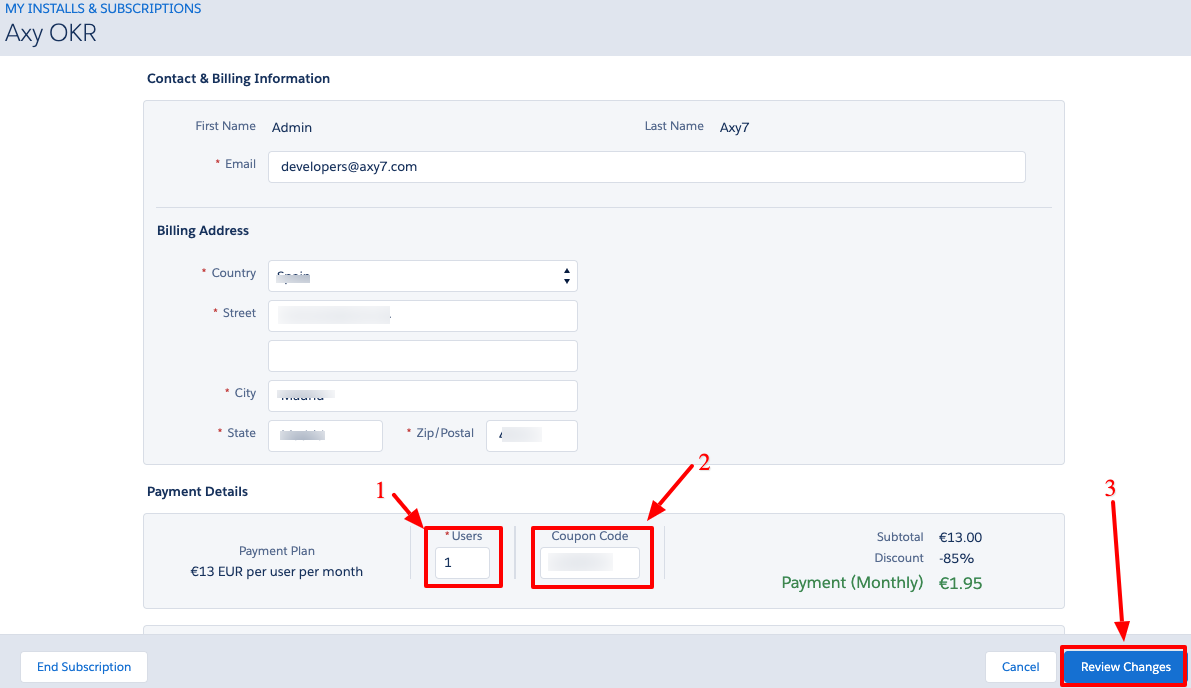
- Just review the changes, accept the terms & conditions, and click Save.
- After this, just wait 15 min to see the changes reflected in your Organization. Then, it’s time to assign the licenses and permission sets to your Salesforce Users.
If you have any questions, comments, or concerns, please contact us.
Your Admin user can add more licenses to your Axy OKR subscription by increasing them in the AppExchange.
Please follow these steps:
Step 1:
- Go to Appexchange.
- Click on Log in and use your Salesforce Admin credentials.
- Click on your photo and select My Installs & Subscriptions.
Step 2:
- Find Axy OKR and select Manage Subscription.
Step 3:
- Click on Edit
Step 4:
- Here, you will be able to update your credit card information for your Axy OKR Subscription and also set a discount coupon if you have it.
On this page, you can also change the Payment Method.
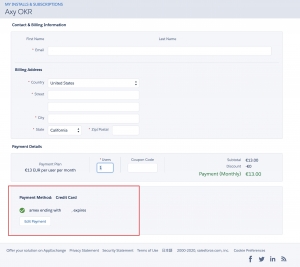
- Just review the changes, accept the terms & conditions, and click Save.
- After this, just wait 15 min to see the changes reflected in your Organization. Then, it’s time to assign the licenses and permission sets to your Salesforce Users.
If you have any questions, comments, or concerns, please contact us.
DOES AXY OKR SUPPORT CLASSIC SALESFORCE UI?
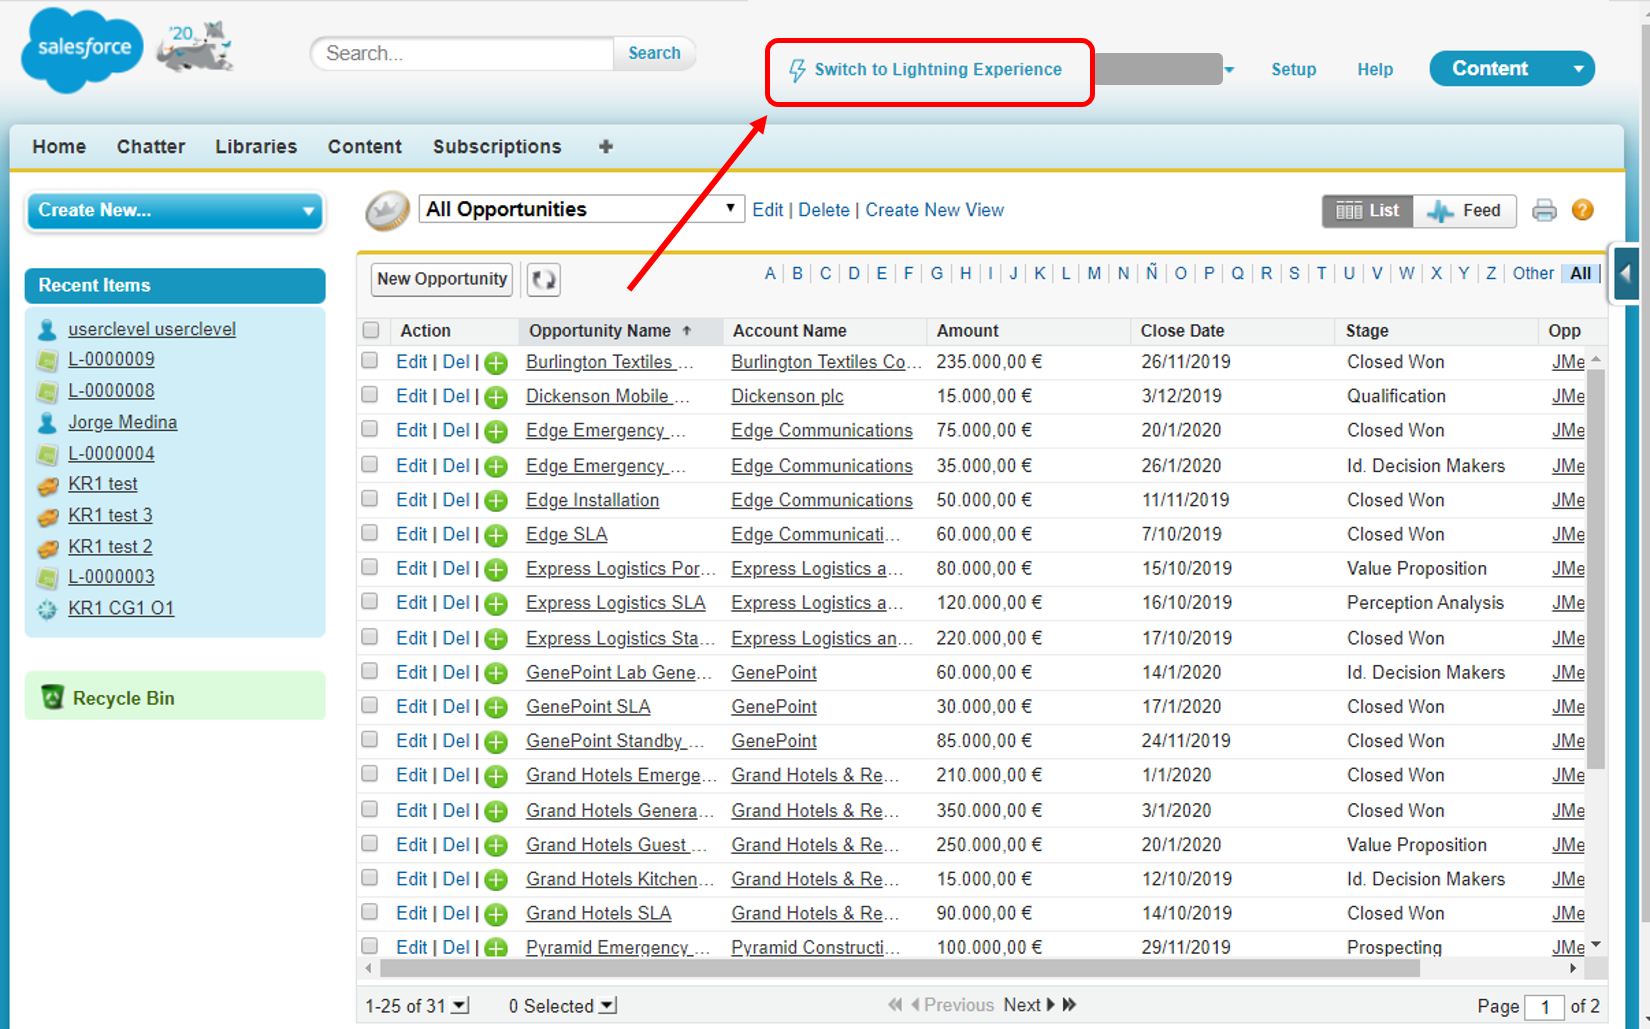
Axy OKR was developed for the Lightning Experience UI (LEX). However, you can still install Axy OKR and use it even if you only use the Classic UI in your org.
We developed Axy OKR for LEX since Salesforce announced in their spring ’19 release notes that they will no longer be adding features to the Classic UI. Every new feature that Salesforce develops for each of its Clouds will only be available for the LEX.
If you are still using the Classic UI in your Salesforce org, you can use Axy OKR by switching from Classic UI to LEX every time you want to use our app (Every user can switch from one UI to the other if your Admin configures it in your org).
It is really easy:
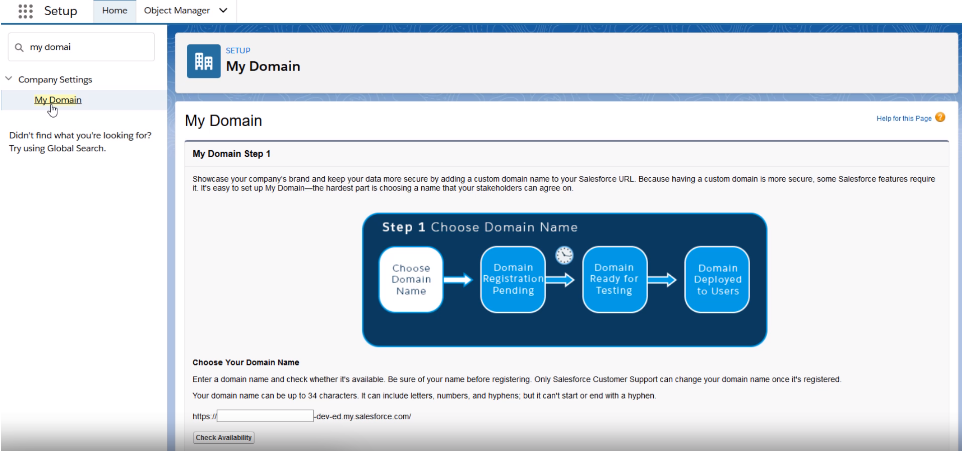
You have to be sure that My Domain is deployed in Your Salesforce Org as it is required to use Lightning components, the basis for LEX.
- When My Domain isn’t deployed in your org, user interface controls related to Lightning components may be hidden or inactive. Lightning components added to pages, tabs, and so on, don’t run and may be omitted or display a placeholder error message.
Deploying My Domain for your org is very straight forward.
- Go to Setup, find My Domain, and start the process following the instructions.
For a detailed description on how to deploy it, you can visit My Domain help in Salesforce Help. Here is a short video on what My Domain is and how to set it up.
ERROR: USER DOESN’T HAVE PERMISSION (changeDashboardColors) TO CREATE DASHBOARDS WITH COLORS
In some cases the Axy OKR installation could fail because the installation user doesn’t have the ‘Change Dashboard Color’ permission enabled. If this is the case, please follow these steps:
- Create a new permission set.
- Find the Change Dashboard Color permission and select it.
- Assign the new permission set to the installation user.
- Try to install the app again.
In order to uninstall Axy OKR, there are two processes that must be manually disabled first.
- Go to Setup
- Find for Process Builder
- Deactivate Axy OKR Objective and Axy OKR Period
Axy OKR also has a Flow that must be disabled.
- Go to Setup
- In Quick Find, look for Flows. You will see Quick KR Creation
- Click on the Drop-Down list at the right and select View Details and Versions
- Deactivate the flow
If you have already been using the app, you have probably assigned the Axy OKR Permission sets. Prior to uninstalling Axy OKR, you have to remove the assignments of every permission set.
- Go to Setup
- Search for Permission Sets
- Click on any of the Axy OKR permission sets and then Manage Assignments
- Click on Add Assignments
- You will access the list of users in your Salesforce org. Check the boxes of the users you want to remove that permission set from and click Remove Assignments
Now you can uninstall the package:
- Go to Setup
- Search for Installed Packages
- Click on Uninstall link near to the Axy OKR Management package
Please read the information provided by the uninstall process, taking into account what you want to do with the data you created while you were using the app.
If you want to save a copy of your data, please select the option “Save a copy of this package’s data for 48 hours after uninstall” and you will receive an email to save your data locally.
Uninstall Axy OKR from the Appexchnage
Sometimes Salesforce does not allow you to uninstall apps from the “Installed Packages” option in the administrator menu. If this is the case for you, then you can uninstall the app directly from the Appexchange. Please follow these instructions:
- Go to the Appexchange.
- Click on Log in and use your Salesforce credentials.
- Click on your photo and select My Installs & Subscriptions.
- Find Axy OKR and select Uninstall from the menu.

IS THERE A USER MANUAL OR GUIDE FOR AXY OKR?
Yes. We have a complete and comprehensive document that shows how to install, configure, and use Axy OKR. Please visit our Axy OKR User Guide.
- Assign licenses
- Assign Permissions Sets
- Share the Reports & Dashboards folders
- Enable the Axy OKR Notification Type to allow notifications in your Android and IOs devices
- Enable & Schedule the Check-in
- Create your Company Goal, Periods, and main OKRs with the Wizard
Now you are ready to start managing your OKRs with Axy OKR. Please go to our User Guide for a complete guide to the app.
HOW ARE PERMISSIONS MANAGED BY AXY OKR?
In Axy OKR you have three Permission Sets to assign to users with different functions and permissions:
- Axy OKR – User. This permission set gives standard access to the app including every app object, mainly Objectives and Key Results. All users of Axy OKR must have this permission assigned
- Axy OKR – C-Level User. This permission is designed for C-Level people, Directors, Managers, etc… the team members with the highest responsibility in managing the organization. These users have the same access as an Axy OKR – User but with Full Access to Company Goal records including View All and Modify All permissions.
- Axy OKR – Admin User. With this permission set, the assigned user has the same access as an Axy OKR – User, with the ability to access and set up the app in the Setup tab.
- Axy OKR – Review Manager. With this permission set, the assigned user will have the ability to configure and manage the Axy Employee Management module:
- Create and modify Review cycles
- Create and modify Questionnaires
- Create and modify Questions
Important note: You have to assign at least one Axy OKR – Admin User, one Axy OKR – C-Level User and one Axy OKR – Review Manager permission sets.
You can add several permission sets to the same user. For example, you can assign Axy OKR – Admin User and Axy OKR – C-Level User to the same user.
To assign them, follow the next steps for each of the three Axy OKR permission sets:
- Go to Setup
- Find for Permission Sets
- Click on any of the Axy OKR permission sets and then Manage Assignments
- Click on Add Asignments
- You will then see the list of users in your Salesforce org. Check the boxes of the users you want to assign that permission set to and click Assign.
- Remember to assign the Axy OKR – User permission to everyone will use the app
HOW CAN I SHARE COMPANY GOALS AND OBJECTIVES MANUALLY?
While manually sharing is available in Lightning Experience, we recommend installing this Salesforce Lab application
Once the app is installed, follow these steps to make sharing available for Company Goals and Objectives:
- Create the Action:
-
- Go to Setup
- Object Manager
- Search for the Company Goal object
- Buttons, Links, and Actions
- New Actions:
- Action Type: Lightning Component
- Lightning Component: LightningSharingAction
- Label and Name: Select the ones that work for you.
- Include the Action in the Page Layout:
-
- Go to Setup
- Object Manager
- Find the Company Goal object
- Page Layouts
- Company Goal Layout
- Select Mobile & Lightning Actions
- Find your new Action
- Drag & Drop to Salesforce Mobile and Lightning Experience Actions Section.
Follow the same instructions for the Objective sharing button.
SHARING REPORT & DASHBOARDS FOLDERS IN AXY OKR
- Go to Axy OKR Setup
- Go to the Check-in & Pulse section
- Activate Enable Check In
- Select a day and hour and click on the Save button
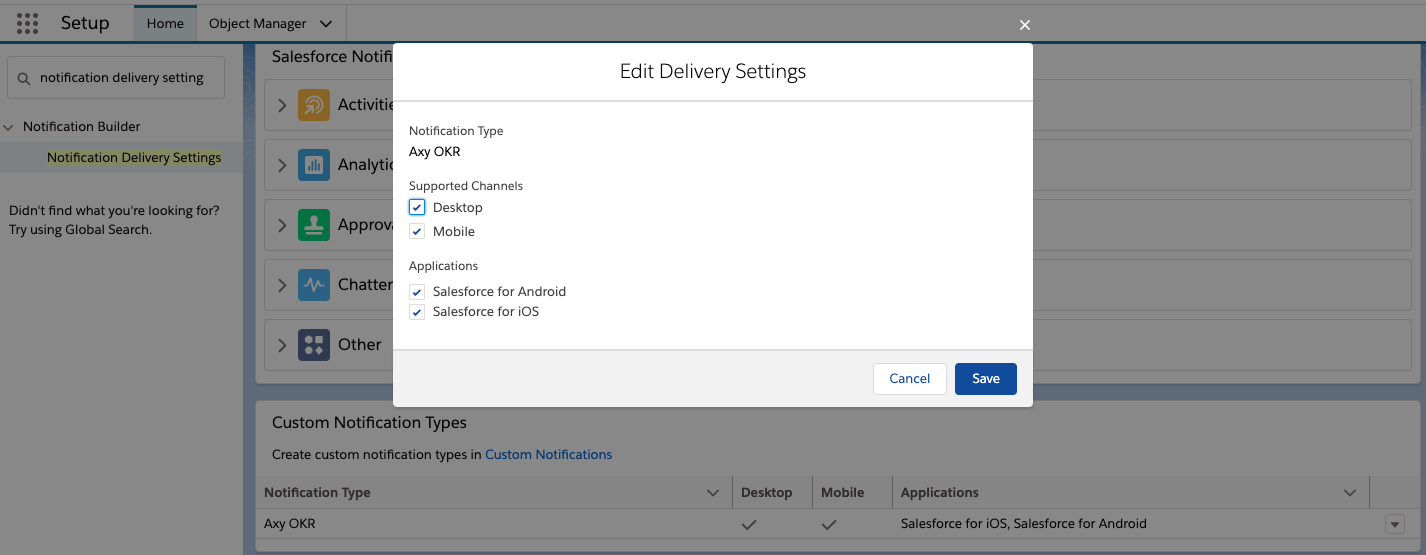
To allow Axy OKR notifications on your devices, you need to enable it in Salesforce Setup.
Follow these steps:
- Go to Salesforce Setup
- Search for Notification Delivery Settings
- Go to the Custom Notification Types section
- Find Axy OKR and click on edit on the right-hand side
- Enable Desktop, Mobile, Salesforce for Android and Salesforce for IOs and click Save
- Go to Axy OKR Setup
- Go to Check-in & Pulse section
- Activate Enable Check In
- Select a day and hour and click on Save button

To allow Axy OKR notifications in your devices, you will need to enable it in Salesforce Setup. Follow these steps:
- Go to Salesforce Setup
- Find for Notification Delivery Settings
- Go to Custom Notification Types section
- Find Axy OKR and click on edit on the right side.
- Enable Desktop, Mobile, Salesforce for Android and Salesforce for IOs and click Save
What is a Company Goal and how to use it correctly?
The concept of Company Goal represents a Single Strategic view that the entire organization should follow in an annual period. It also defines the cycle that your team should organize your OKRs within.
When you start planning your OKRs for the year, you must first set your Company Goal and the OKR Cycle structure:
- The period for the Company goal and the main Company OKRs (normally a year)
- The periods for the OKR execution during the year (usually Quarters)
- The Planning and Wrap-Up time for every period (usually one or two weeks at the beginning and end of the period)
Main Company OKRs will then be defined from the Company Goal. Axy OKR provides a wizard in order to create the Company Goal, the Periods, and one main Company OKR. You must define the rest of the main Company OKRs that you need.
As an example, the wizard will help you create the following:
Company Goal: First one in market share in 2020
- Main Objective 1: Double size at the end of fiscal year 2020 (Yearly Period)
- Key Result 1.1: Launch at least two new product releases
- Key Result 1.2: $57M revenue in 2020
- Key Result 1.3: Increase NPS by 20%
Then you have to create the rest of the main Company OKRs. Continuing with the example:
- Main Objective 2: Engage employees and increase loyalty (Yearly Period)
- Key Result 2.1: Get Best Place to Work certification
- Key Result 2.2: Improve referral program by 15%
- Key Result 2.3: Reduce employee attrition by 17%
- Main Objective 3: ………
The Company Goal and main company OKRs are set as private by default. This ensures that the Management and C-Level executives have enough time to discuss and define the OKRs and basic strategy to follow. Once agreed, they are shared with the rest of the organization and marked as public afterward, after which the rest of the team is able to create OKRs related to any higher level OKR.
You can access our FAQ about Objectives, Key Results, and Initiativeshere.
HOW CAN I CREATE A QUESTION FOR MY TEAM WEEKLY CHECK-IN?
- Head to the questions tab, then click on new. A pop up will appear.
- In record type select Check-In.
- Then type your question.
- Complete the information form by defining a start date (from) and end date (to) the answer type (text, number, checkbox, or picklist). If you select Picklist, enter the possible options on the picklist options field. Separate each option with a comma.
- If the question is mandatory check the required checkbox at the left bottom corner.
- Then click Save.
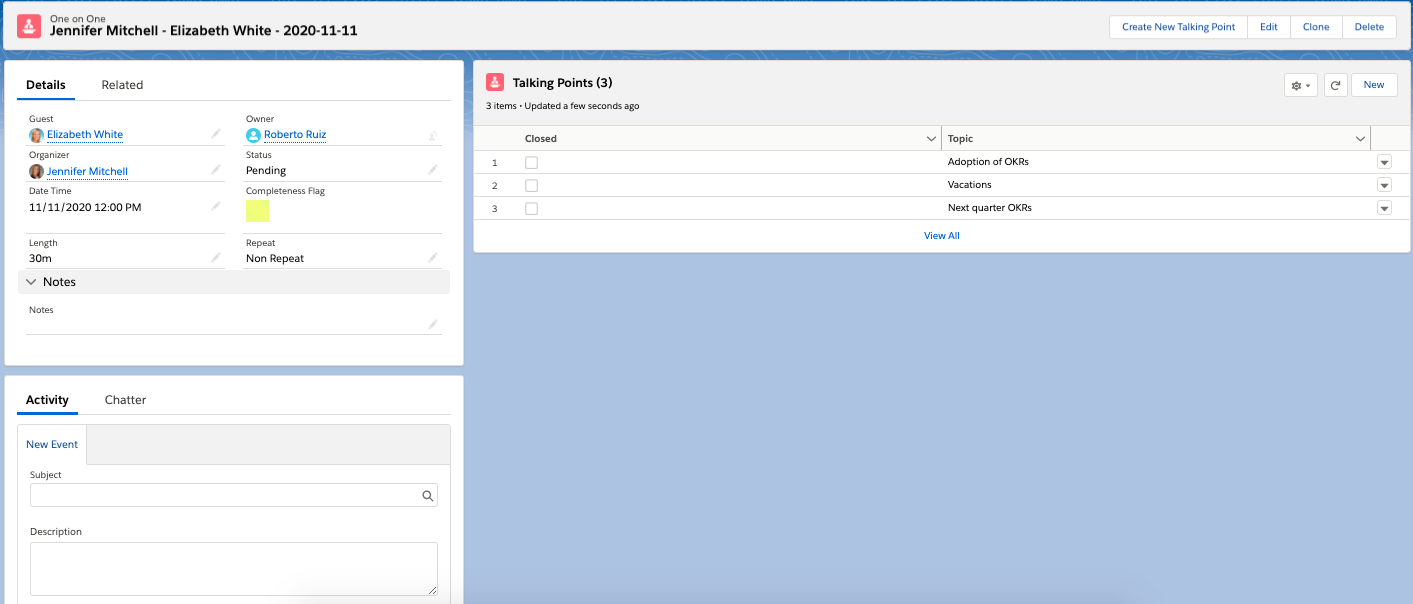
HOW CAN I WRAP UP MY OKR WITH MY MANAGER DURING A ONE ON ONE SESSION?
On the One on One meeting view look for Guest OKRs and the wrap-up alert in your theme:
- Click on it. A wrap-up pop up will appear.
- There you can mark the objective as achieved or failed.
- Then you must score the objective by clicking on the scale.
- Afterward, type in your self-assessment and ask your manager to give you feedback, and enter it in the manager feedback box.
- Then click save.
WHAT TYPE OF CUSTOM QUESTIONS DOES AXY-OKR SUPPORT AND HOW CAN I SEE THE ANALYTICS RESULT?
Axy OKR allows you to ask any type of question to your employees. You can set four types of answers to your questions which are: text, number, checkbox (yes or no) or picklist. If you select Picklist, you must define the possible options on the picklist options field by separating each option with a comma.
HOW CAN I QUICKLY CREATE A FULL OKR DURING A 1.1 SESSION OR IN MY FOCUS MODULE?
On the One on One meeting view look for Organizer’s OKRs.
- Click on the Key results link to view the OKRs of the parent objective.
- Then click on the convert to child objective icon.
- After that, fill in the information required (objective name, period, key results, and targets).
- Then click on save.
WHAT IS A PLANNING OR WRAP-UP STAGE DURING AN OKR PERIOD?
Typically per quarter, you have a 2 week planning period where the following definitions are done:
- Define the quarterly Objectives for the company
- Cascade Top-Down OKRs into the organization
- Ask for Bottom-Up OKRs
- Have team objectives discussions
- Approve objectives if needed by managers
The wrap-up cycle starts automatically at the period end date. In this period you must:
- Update the final result of every manual type OKRs, including the last tasks for the KRs based on tasks
- Sit down with your manager to discuss your progress on OKRs during the past period.
- Receive his/her feedback
- Think of and review the validity of the actions and key results that have been defined in order to reach the objective. Analyze whether obtaining the key results have actually contributed to the objective or not
- Score the objectives. Axy OKR will show you, as a guide, the Achievement and the Progress %, according to the KR actual results and the assigned weights. But you and your manager have to really score the Objective. This scoring is a number between 0 and 1:
- 0.7 to 1.0 = green. (We delivered.)
- 0.4 to 0.6 = yellow. (We made progress, but fell short of completion.)
- 0.0 to 0.3 = red. (We failed to make real progress.)
- Learn from it to plan the following period
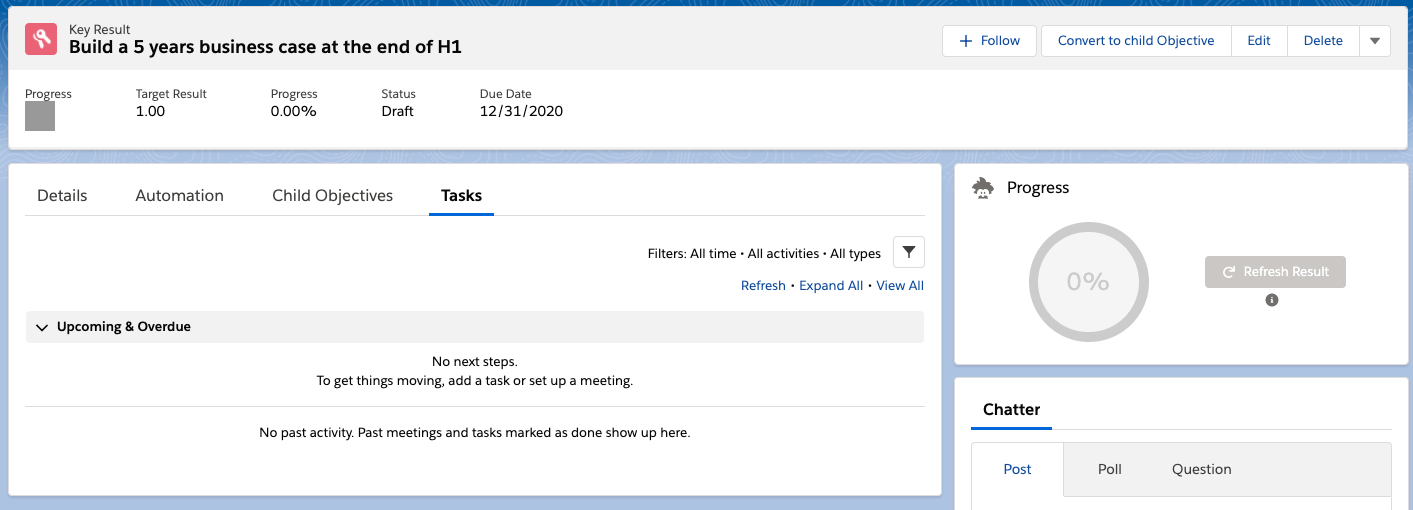
ENABLE TASK CREATION ON THE KEY RESULT PAGE
If you can see the Tasks tab but you can’t see the component to create a Task like in the image below, follow the instructions to re-use or create a new Global Action.
As part of a managed package, we cannot select your record types. To configure them, you have 3 options:
Create an Object-Specific Quick Action
- Go to the Setup page, click on the “Object Manager” tab, and search for “Key Result”.
- Select the “Buttons, Links, and Actions” option.
- Click on the “New Action” button using this information:
- Action Type: Create a Record
- Target Object: Task
- Record Type: [The one you want to use] *OKR users should have access to the record type in their profiles
- Standard Label Type or Label: [Select or create a label]
- Name: the unique name for the global action
- Description: write a brief description
- Create Feed Item: If enabled, it creates a feed item when the action is performed. The feed item’s fields are defined by the target object’s compact layout.
- Success Message: the success message you want to show when the task is created
- Click on the “Save” button.
- Select the fields to show on the component layout.
- Select the “Page Layouts” menu item and click on the “Key Result Layout” link.
- Select the “Mobile & Lightning Actions” option and add the recently created action to the “Salesforce Mobile and Lightning Experience Actions” section.
- Remove the “New Task” Action from the “Salesforce Mobile and Lightning Experience Actions” section.
- Click on the “Save” button.
Create a new Global Quick Action
- Go to the Setup page and search “Global Actions”.
- Click on the “New Action” button using this information:
- Action Type: Create a Record
- Target Object: Task
- Record Type: [The one you want to use] *OKR users should have access to the record type in their profiles
- Standard Label Type or Label: [Select or create a label]
- Name: the unique name for the global action
- Description: write a brief description
- Create Feed Item: If enabled, it creates a feed item when the action is performed. The feed item’s fields are defined by the target object’s compact layout.
- Success Message: the success message you want to show when the task is created
- Click on the “Save” button.
- Select the fields to show on the component layout.
- Click on the “Object Manager” setup tab and search for “Key Result”.
- Select on the “Page Layout” menu item and click on the “Key Result Layout” link.
- Select the “Mobile & Lightning Actions” option and add the recently created action to the “Salesforce Mobile and Lightning Experience Actions” section.
- Remove the “New Task” Action from the “Salesforce Mobile and Lightning Experience Actions” section.
- Click on the “Save” button.
Re-use an existing Global Action
If you have an existing task global action with a valid record type, you can add your action to the layout by following the previous steps from 5 to 9 using your global action instead of the new one.
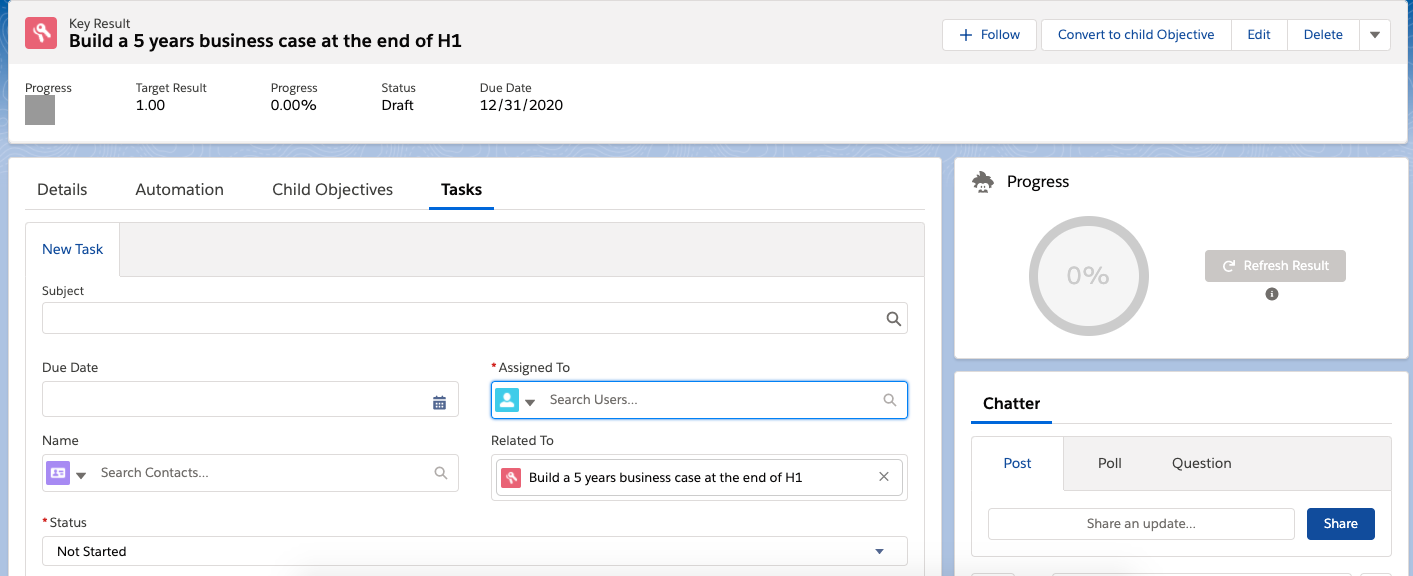
In both cases, you will see the task component in the Key Result page as below:
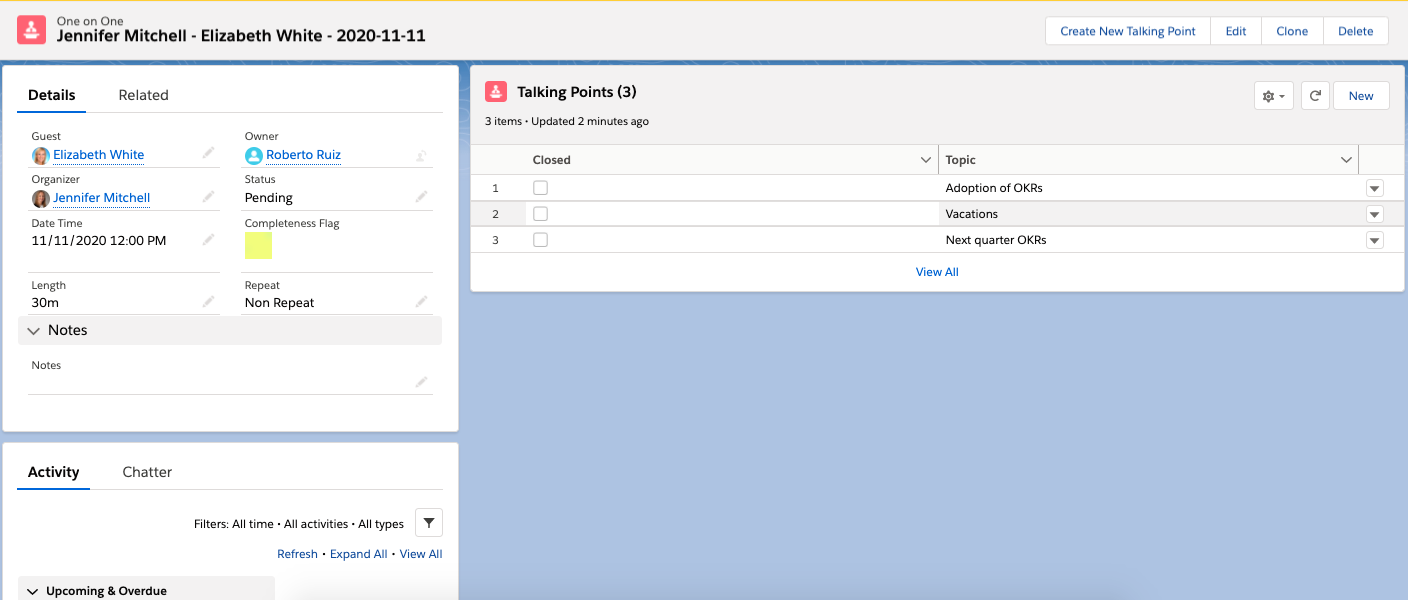
ENABLE EVENT CREATION ON ONE ON ONE PAGE
If you cannot create an event in the one on one record page like in the below image, follow the instructions to re-use or create a new Global Action.
As part of a managed package, we cannot select your record types. To configure them, you have 3 options:
Create an Object-Specific Quick Action
- Go to the Setup page, click on the “Object Manager” tab and search for “One on One”.
- Select the “Buttons, Links, and Actions” option.
- Click on the “New Action” button using this information:
- Action Type: Create a Record
- Target Object: Event
- Record Type: [The one you want to use] *OKR users should have access to the record type in their profiles
- Standard Label Type or Label: [Select or create a label]
- Name: the unique name for the global action
- Description: write a brief description
- Create Feed Item: If enabled, it creates a feed item when the action is performed. The feed item’s fields are defined by the target object’s compact layout.
- Success Message: the success message you want to show when the event is created
- Click on the “Save” button.
- Select the fields to show on the component layout.
- Select the “Page Layouts” menu item and click on the “One on One Layout” link.
- Select the “Mobile & Lightning Actions” option and add the recently created action to the “Salesforce Mobile and Lightning Experience Actions” section.
- Remove the “New Task” Action from the “Salesforce Mobile and Lightning Experience Actions” section.
- Click on the “Save” button.
Create a new Global Action
- Go to the Setup page and search for “Global Actions”.
- Click on the “New Action” button using this information:
- Action Type: Create a Record
- Target Object: Event
- Record Type: [The one you want to use] *OKR users should have access to the record type in their profiles
- Standard Label Type or Label: [Select or create a label]
- Name: the unique name for the global action
- Description: write a brief description
- Create Feed Item: If enabled, it creates a feed item when the action is performed. The feed item’s fields are defined by the target object’s compact layout.
- Success Message: the success message you want to show when the event is created
- Click on the “Save” button.
- Select the fields to show on the component layout.
- Click on the “Object Manager” setup tab and search for “One on One”.
- Select the “Page Layout” menu item and click on the “One on One Layout” link.
- Select the “Mobile & Lightning Actions” option and add the recently created action to the “Salesforce Mobile and Lightning Experience Actions” section.
- Remove the “New Event” Action from the “Salesforce Mobile and Lightning Experience Actions” section.
- Click on the “Save” button.
Re-use an existing Global Action
If you have an existing event global action with a valid record type, you can add your action to the layout by following the previous steps from 5 to 9 using your global action instead of the new one.
In both cases, you will see the task component in the One on One page as below:
WHAT TYPE OF KEY RESULTS AXY OKR HAVE?
Key results in Axy OKR can be measured as boolean, number, percentage, currency, or TODO types. All of these types allow assigning a target value to a Key Result in order to measure the progress. These types are used to measure different categories of KRs:
- To reach or meet a specific outcome, use NUMBER or CURRENCY
- To reduce or increase any metric in a portion, use PERCENTAGE
- For reaching thresholds or meeting specific conditions, use BOOLEAN (Yes/No)
- If you want to track milestones or activities, then use TODO
WHAT IS PROGRESS AND ACHIEVEMENT IN AXY OKR?
Axy OKR has several parameters for assessing the progress and achievement status of both Objectives and Key Results.
OBJECTIVES have several fields that indicate status and all of them are automatically calculated. The two main ones are Progress and Achievement.
- PROGRESS (%). Indicates the percentage of progress based on the Progress of KRs and the weight of each KR in its contribution to the OBJECTIVE
– Example: An OBJECTIVE with two KRs, one with 100% progress and a weight of 40% and another with 40% progress and a weight of 60% will result in an OBJECTIVE PROGRESS of 64%. - ACHIEVEMENT FORECAST. An indicator of the progress in relation to the elapsed time. If it is less than 100%, it indicates that there may be a risk of not reaching it
- ACHIEVEMENT. This field is calculated automatically if desired, or assigned manually. It is an indicator of the progress of the OBJECTIVE. If it is automatic, it is calculated based on the Achievement forecast and the time remaining to reach the OBJECTIVE.

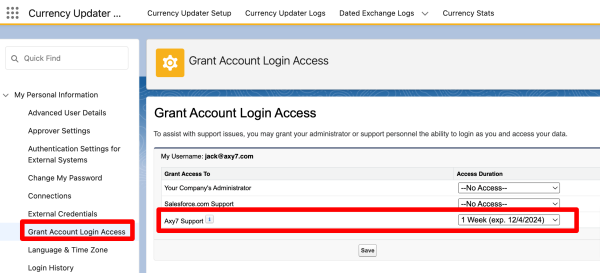
Salesforce Classic
- Choose one of the following:
- Navigate to Setup –> My Personal Information –> Grant Login Access
- Navigate to Your Name –> My Settings –> Personal –> Grant Account Login Access
- Use the Access Duration picklist to set the number of days to allow Login Access.
- Click Save.
Lightning Experience User Interface
- Click on the logged-in user’s avatar on the top right-hand side of the screen and choose Settings.
- Click on Grant Account Login Access.
- Use the Access Duration picklist to set the number of days to allow Login Access.
- Click Save.
HOW DO I CREATE AN OKR TO CONTRIBUTE TO MY MANAGER’S OBJECTIVES IN AXY OKR?
You can create a child objective directly from a Key Result by using the Convert to Child Objective button. This is a fantastic way to contribute and directly align your objectives with the OKRs of your manager or other people in the organization,
- From any Key Result page, click on Convert to Child Objective button
- A pop-up window with default information from the Key Result will appear
- Edit the Objective Name, Type, Status and Period if needed, and save
- If you go to the Child Objectives tab, you will see your new Objective
There is an easy way to create one directly from the Tree View. Learn how in this short video
HOW CAN I USE FILTERS TO NAVIGATE IN THE TREE VIEW?
Alignment is key to organizational success. For aligning OKRs, the Tree View is a powerful visual tool and will enable you to:
- See the complete scheme of OKRs dependencies and contributions.
- Find how every objective owner is contributing to the parent OKR
- Objective details and key results are accessible by clicking on every box
- Navigate through the tree using the filters and search boxes:
- Selecting the root company goal
- Filtering by objective achievement
- Showing all or only your objectives
- Showing the complete hierarchy of the objectives or a number of tree levels
- Searching objectives by name or by owner
- Switch from a pure Tree view to a Tab List view, whatever is more convenient for you
- Expand and collapse the tree levels by clicking on the “yellowed” OKRs boxes
In this short video you will see how to navigate the Tree view
HOW WILL AXY OKR AUTOMATICALLY UPDATE MY KEY RESULTS?
A very unique feature of Axy OKR is the possibility to automatically track and measure the progress of a Key Result by binding Salesforce reports to them.
You can set any aggregated report field of any report to the Key Result you want to track. A few examples:
- Pipeline coverage, quota attainment, revenue amount… for Sales KRs
- Average case time resolution, percentage of First Call Resolution… for Customer Care KRs
- Number of MQLs, SEM efficiency by UTMs… for Marketing KRs
- The number of New Distributors, revenue from Dealers… for Channel Sales KRs
- …
Go through the following steps to bind a report to a Key Result
- Browse to any Key Result page
- Click on the Automation sub-tab
- Toggle the Automation Mode switch on
- Search the report you want to bind
- Select the Aggregate Field of the report you want to use to track the Key Result
- A success message will appear as Axy OKR is running the report and updating the result
Go to this How to… for a short video showing how to bind a report to a Key Result.
Important note: Axy OKR runs the report using the objective’s owner user. This means that visibility sharing settings are applied, so the data gathered from the report is the correct one for every Key Result owner.
In addition, if you are contributor’s type responsible and the OKRs type is set as Team, you can manually refresh any key result report bound.
WHAT IS AN AGGREGATE RESULT FIELD?
In a Salesforce report, you can summarize fields. When you want to know the sum, average, highest, or lowest value of a numeric column (like Amount, Age, or Probability), just summarize the column. Axy OKR will take into account the grand total for its calculations.
This is the Aggregate field that will update the progress of the Key Result.

DOES AXY OKR TAKE RECORD VISIBILITY INTO ACCOUNT?
Yes! Axy OKR respects Salesforce’s record visibility and runs reports using the objective owner’s user. This means that visibility sharing settings are applied so the data gathered from the report is accurate for every Key Result owner.
IS AXY OKR CONSIDERING RECORD VISIBILITY?
Yes! Axy OKR tool respects Salesforce record visibility. Axy OKR runs the reports using the objective’s owner user. This means that visibility sharing settings are applied, so the data gathered from the report is the correct one for every Key Result owner.
WHAT TYPES OF REPORTS ARE SUPPORTED FOR AUTOMATION IN AXY OKR?
You can use every type of report that has at least a grand total field.
For summary and matrix reports, you can use any summarized field. You can use formulas if they are applied to summarized fields.
For any kind of report, you can use record count if it is included in the report.
WHICH INTEGRATIONS IS AXY OKR SUPPORTING FOR KEY RESULT TRACKING?
Axy OKR automates KR tracking and supports every integration you have if it can be reflected in a Salesforce report.
ERROR TRANSFERRING AN OBJECTIVE IN AXY OKR
If you try to transfer an objective and get the error ‘Before you can transfer this record, the new owner needs Read permission on it and related records’, it is because the new owner does not have access to the application.
Please read here to find out how to assing Axy OKR licenses.
![]()